


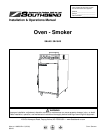


OPERATING INSTRUCTIONS OVEN / SMOKER
PAGE 6 OF 24 INSTALLATION & OPERATIONS MANUAL 1189200 REV 0 (12/06)
RECEIPT AND INSTALLATION
RECEIPT:
IMMEDIATELY INSPECT FOR SHIPPING DAMAGE
All containers should be examined for damage before and during unloading. The freight carrier has assumed
responsibility for its safe transit and delivery. If damaged equipment is received, either apparent or concealed, a
claim must be made with the delivering carrier.
Apparent damage or loss must be noted on the freight bill at the time of delivery. The freight bill must then be
signed by the carrier representative (Driver). If the bill is not signed, the carrier may refuse the claim. The carrier
can supply the necessary forms.
A request for inspection must be made to the carrier within 15 days if there is concealed damage or loss that is
not apparent until after the equipment is uncrated. The carrier should arrange an inspection. Be certain to hold all
contents plus all packing material.
A. Inspect the entire perimeter of the package for damage or punctures to the packing material.
This may indicate damage to the unit inside. Call any and all packing damage to the
attention of the delivery person.
B. If any packing damage is found uncrate the unit immediately in the presence of the delivery
person to determine if the unit is damaged. If any damage is found indicate the type and
amount of damage on the shipping documents and notify Southbend at (919) 552-9161
immediately after filing a freight claim.
C. Uncrate the unit carefully and check the entire unit (top, front, back and both sides) for any
visible or hidden damage.
D. Remove the unit from the shipping pallet and inspect the bottom for any damage.
E. If any damage is noted after the driver leaves immediately contact the freight company and
Southbend.
F. Check each Oven Door. Make sure the Door closes completely, and that the Door Gasket
seals firmly. If the Gasket does not seal correctly please contact the Southbend Service
Department for instructions and assistance in any required adjustments.
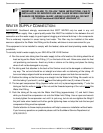
INSTALLATION:
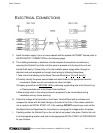
A. Check to determine that the power source is the same voltage and phase as that indicated
on the label on the side of the unit.
B. If you have received an SB-5-ES you should attach the included Appliance Legs to the
bottom of the unit. Each Leg stud screws into a threaded hole in each corner of the base.
C. Position the unit where it is to be operated and adjust the Appliance Legs of the SB-5-ES so
the unit stands level and solid. If you have an SB-10-ES you may need to use metal shims
under the Casters to level the unit.
D. For the SB-5-ES: Make sure the GREASE PAN is installed inside the bottom of the unit. This
PAN will catch most of the drippings from your product as it is processed, making clean-up
that much easier.
For the SB-10-ES: Make sure the GREASE PAN is installed beneath the unit. This PAN will
catch the liquid that accumulates in the bottom of the unit while you are processing your
product.
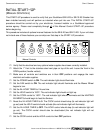
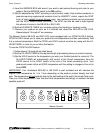
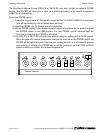
E. Carefully set all Controls and Switches to their OFF positions.