


17
SECTION 4
TROUBLESHOOTING
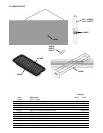
4.1 LIGHT INDICATORS
The freezer has two lights that will alert the user if a problem occurs: an ADD MIX light and a Diagnostic Light.
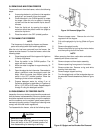
The ADD MIX light will flash to alert the operator to a low mix condition. It does so by monitoring the mix level in the
hopper. When the ADD MIX light is flashing, refill hopper immediately.
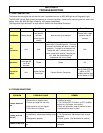
The Diagnostic Light will flash if an error occurs. Refer to the chart below for details.
4.2 TROUBLESHOOTING
PROBLEM POSSIBLE CAUSE REMEDY
Freezer does not
run.
1. Power to freezer is off.
2. Blown fuse or tripped circuit.
3. Freeze-up (auger will not turn).
4. High pressure cut-out tripped.
5. Front door not in place.
1. Supply power to freezer.
2. Replace or reset.
3. Turn CLEAN-OFF-ON switch to OFF (middle)
position for 15 minutes, then restart.
4. Wait until automatic reset for freezer to start.
5. Assemble front door in place.
Freezer will not
shut off.
1. Drive belt failure.
2. Consistency temperature setting is too
firm.
3. Refrigeration problem.
1. Replace drive belt.
2. Turn Consistency Adjustment knob counter-
clockwise.
3. Check system. (Call distributor for service)
Product is too firm.
1. Consistency temperature setting is too
firm.
1. Turn Consistency Adjustment knob counter-
clockwise.
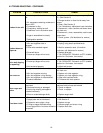
Indication On One Blink Two Blinks Three Blinks
Conditions
Defrost Mode
Torque is not
met after 20
minutes
(22 minutes for
shake)
Drive current is not sensed
Freezer left in clean
mode for over 20
minutes
Self
Correction
N/A N/A
The freezer attempts to sense drive
current with a 3 second pre-stir. If current
is sensed, the freezer will return to normal
operation. If current is not sensed, the
freezer will wait 7 minutes and try to
sense current with another 3 second pre-
stir. After the third attempt, the
compressor will run on timers.
N/A
Operation
Every 7 minutes
the auger will
run for 90
seconds.
Timers Timers Off
Corrective
Action
N/A
Contact Service
Technician
Contact Service Technician
Turn CLEAN-OFF-ON
switch to OFF
(middle) position then
turn the switch to ON.