


dough onto a floured bread board (or clean counter top)
and begin kneading by
hand. Add water by the tablespoon only if the dough does not hold together in a
single large piece or ball.
Kneading is the process of massaging the dough by folding, pushing and turning
in a continuous manner that develops the gluten in the flour that allows the dough
to stretch without tearing. Kneading longer (and using a slightly wetter dough)
generally makes the pizza crust more chewy. Working with the heals of your hands,
push into the dough and stretch the dough out and away from you as you lean
forward. As you bring your body back, fold the dough over and give it about a
1/4 turn. Repeat the process. If your hands stick to the dough, flour them lightly.
Knead for at least 3 – 5 minutes until the dough forms into a single ball. Cut this
ball down the middle and each half will make a 12-inch pizza.
Form the half into another (now smaller) ball and place in the middle of an oiled
12-inch pizza pan. Oil the pan even if it is non-stick as the oil improves the crust.
Push down on the ball to flatten and begin pressing down and out from the middle
with your oiled finger tips, rotating the pan as you go. You are stretching the dough
from the middle to the outside of the pan. Keep pressing down and out and rotate
the pan slightly. Repeat the process until the dough is stretched out. It will take
some practice, but the goal is to achieve a relatively uniform thickness of no more
than 1/4-inch across the surface with thicker crust around the rim to hold in the
sauce and toppings.
Please remember that homemade pizza dough must be pre-baked prior to final baking.
Refer to the “Rising Dough for Gourmet Pizza” Section.
PRE-BAKING THE CRUST AND COOKING THE PIZZA
1.
Turn power on by rotating the Timer Control Knob clockwise and let the Pizza
Oven pre-heat for approximately 3 minutes. The Power Indicator Light will turn on.
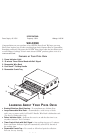
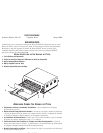
2. Pull out the Removable Wire Rack with the Cool-Touch™ Folding Handle.
Put the pizza pan on the middle of the rack surface and slide the rack back
into
the Pizza Oven. The raised “bumps” along the sides and front of the
Removable
Wire Rack are to help stabilize the pizza pan during handling.
However, the metal pan will slide easily on the Removable Wire Rack,
so please be careful.
3. Set cooking time to approximately 4 to 6 minutes to pre-bake the Pizza crust
slightly. The Power Indicator Light will turn on.
The Timer Control Knob can
be turned counterclockwise to adjust the time down or to turn the unit off.
4. When the Timer Control Knob reaches the Off /O position, the Power
Indicator Light and Pizza Oven will turn off with a bell (“ding”) signal.
5. The pizza crust should just be slightly brown along the rim and top surface.
Don’t be alarmed if the center of the pizza crust has risen somewhat as this
will go down again when the sauce and toppings are added.
6.
For best results, the final baking of the pizza is done on the Removable Wire Rack.
Use an oven mitt or other protection against the hot pizza pan and slide the
pre-baked pizza crust off of the pizza pan and onto the Removable Wire Rack.
7. You can brush olive oil on the crust first or just add your favorite pizza sauce,
cheese and toppings.