


20
Models 150, 152, 162, 168Operating Procedures
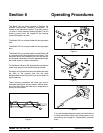
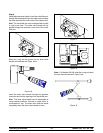
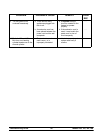
Step 6
Slide the rear drip pan into the hole in the side panel.
Figure 33
Closing Procedure
To disassemble the Models 150/152/162/168, the
following items will be needed:
S T wo cleaning pails
S Sanitized stainless steel rerun c an with lid
S Necessary brushes (provided with freezer)
S Cleaner
S Single service towels
Draining Product From the
Freezing Cylinder
Step 1
Place the power switch in the “OFF” position as far
ahead of cleaning time as possible. This will allow
frozen product to soften for easier cleaning.
Step 2
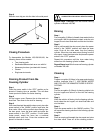
Lift the hopper cover. Remove the air tube and mix
level float. Take them to the sink for c leaning.
Step 3
With a sanitized pail beneath the door spout, place the
power switch in the “WASH” position and raise the
draw valve. When all the product stops flowing from
the door spout, lower the draw valve and place the
power switch in the “OFF” position. If local health
codes permit, empty the rerun into a sanitized
stainless steel r erun can. Cover the container and
place it in the walk-in cooler.
ALWAYS FOLLOW LOCAL HEALTH CODES.
Repeat Steps 1 through 3 for the second freezing
cylinder on Models 162/168.
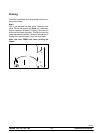
Rinsing
Step 1
Pour one gallon (3.8 liters) of cool, clean water into the
mix hopper. With the brushes provided, scrub the mix
hopper, the mix level float stem and the mix inlet hole.
Step 2
With a pail beneath the door spout, place the power
switch in the “WASH” position and raise the draw
valve. Drain all the rinse water from the freezing
cylinder. When the rinse water stops flowing from the
door spout, lower the draw valve and place the power
switch in the “OFF” position.
Repeat this procedure until the rinse water being
drawn from the freezing cylinder is clear.
Repeat Steps 1 and 2 for the second freezing cylinder
on Models 162/168.
Cleaning
Step 1
Prepare one gallon (3.8 liters) of an approved cleaning
solution (example: Kay-5t). USE WARM WATER
AND FOLLOW THE MANUFACTURER’S SPECIFI-
CATIONS.
Step 2
Pour the one gallon (3.8 liters) of cleaning solution into
the mix hopper and allow it to flow into the freezing
cylinder.
Step 3
While the solution is flowing into the freezing cylinder ,
brush-clean the mix hopper, mix level float stem and
mix inlet hole.
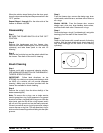
Step 4
Place the power switch in the “WASH” position. This
will cause the cleaning solution in the freezing cylinder
to agitate.
Step 5
Place an empty pail beneath the door spout and raise
the draw valve. Draw off all the cleaning s olution.