


English 8
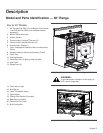
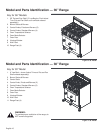
5. Gliding Oven Racks
Your Thermador range includes three extendable,
gliding racks that can be pulled out and pushed back
into the oven with minimum effort - even while
supporting a large turkey or roast. If yours is a 48"
model, the secondary oven of your range also has two
gliding racks.
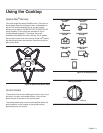
• Placing Racks in Oven:
To insert a rack into the oven, hold the rack with
the back rail up toward the back. Place the safety
hooks under the front of the rail guides. Push the
rack into the oven, lifting the rack stops over the
front of the rail guides. Slide the rack into position.
When placing food on a rack, pull the rack out to
the stop position. The racks are designed to lock
and not tilt while in fully-extended position.
• Removing Racks from Oven:
To remove or reposition a rack in the oven, pull the
rack toward the front of the oven. Lift up the front of
the rack over the safety stops and pull the rack
from the oven.
• Place oven racks in desired positions before
turning on the oven.
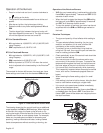
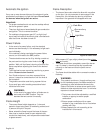
Side View of Oven Rack on Rack Guide:
6. Ensure that the burner caps are correctly seated on
the burner bases of the range's cooktop. Turn on
each burner to check for proper flame color. See
page 14 for details.
CAUTION:
Aluminum foil should never be used to cover the
oven racks or to line the oven. Do not remove
the infrared burner in the gas oven.
Note:
It is normal for the cooling process to push heated air out
into the room when the oven is on.
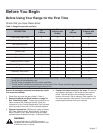
Before baking or broiling, the oven and broiler should be
turned on to burn off the manufacturing oils. Turn the oven
on to 450°F (230°C) for 20 to 30 minutes; then turn the
broiler to "BROIL” for same length of time. You may wish
to turn on the ventilator above your range during this time.
Please note that it is normal for small amounts of smoke to
be visible from the range, during this initial breaking-in
process.
Please read “Care and Maintenance” on page 28 before
cleaning the oven racks.
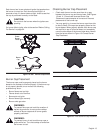
Figure 1: Oven Rack Positions
Figure 2: Gliding Oven Rack
5
4
3
2
1
Figure 3: Side View of Oven Rack
IMPORTANT:
When placing the gliding rack in the oven, make sure
the front supports on the rack guides rest in the large
slots at the front corners of the rack, as shown. This
is necessary to keep the rack in the correct position
while fully inserted into the oven.