SEM/SEMW Oven Care and Use Manual
7
S
T
A
R
T
12 34 5 6 78 90
L
OW
E
R
OV
E
N
T
IM
E
R
1
T
IM
E
R
2
S
E
L
F
C
L
E
AN
T
IM
E
R
1
O
FF
T
IM
E
R
2
O
FF
C
L
O
C
K
T
IM
E
S
T
O
P
T
IM
E
C
L
O
C
K
P
AN
E
L
L
O
C
K
OV
E
N
O
FF
OV
E
N
L
IGH
T
F
A
S
T
P
R
E
H
E
A
T
C
ONV
E
C
T
ION
P
R
O
B
E
B
AK
E
C
ONV
E
C
T
ION
B
AK
E
WA
R
M
P
R
OO
F
C
ONV
E
C
T
ION
R
OA
S
T
C
ONV
E
C
T
ION
B
R
OI
L
B
R
OI
L
B
R
OI
L
D
E
HYD
R
A
T
E
U
PP
E
R
OV
E
N
OV
E
N
L
IGH
T
OV
E
N
O
FF
C
OOK
R
OA
S
T
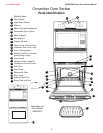
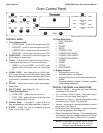
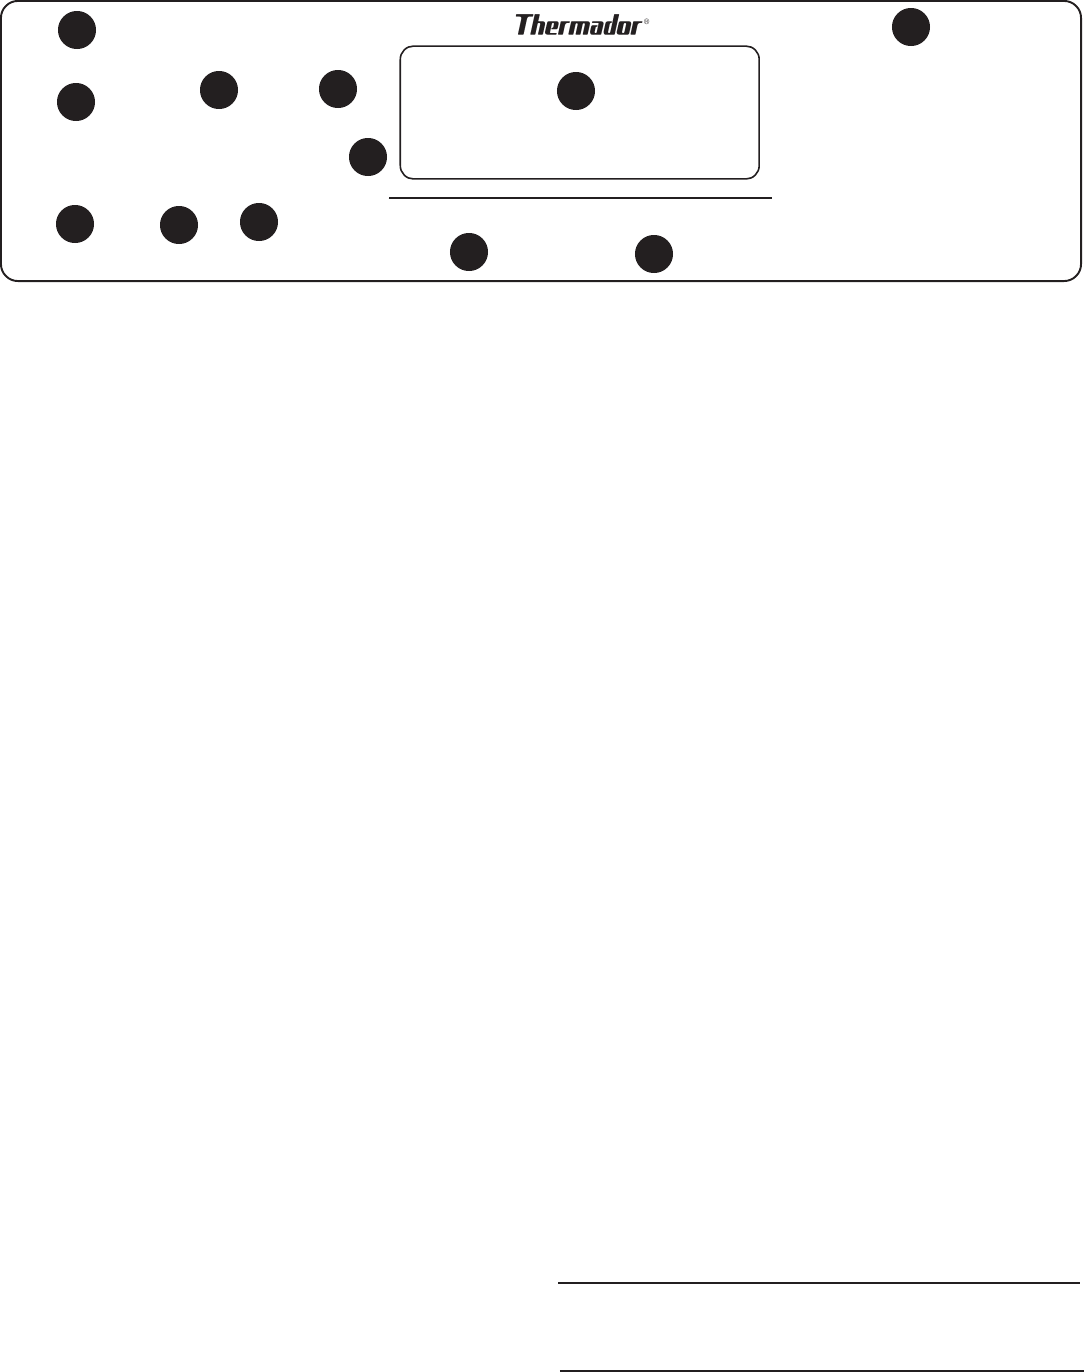
Oven Control Panel
Oven Features
1
2
3
4
5
7
8
9
10
11
CONTROL MENU
1. Oven Selector Pads
• UPPER OVEN – touch to turn upper oven ON.
• OVEN OFF – touch to turn the upper oven OFF.
• LOWER OVEN – touch to turn lower oven ON.
• OVEN OFF – touch to turn the lower oven OFF.
2. OVEN LIGHT – (two pads) Turns oven lights on or
off for upper or lower oven.
3. Timers – There are two timers that count down in
minutes and seconds or in hours and minutes.
•
TIMER 1 (or 2) and TIMER 1 (or 2) OFF
–
sets
kitchen timers and turns timers off.
See Page
12.
4. PANEL LOCK – also referred to as Child Lock-
Out; select this to prevent the control pads from
being activated when oven is not being used. Touch
and hold for 5 seconds to activate; repeat to can-
cel.
5 . CLOCK – Use to set the time of day and timer(s)
countdown.
6. SELF-CLEAN – See Pages 28 - 30.
7. Timed Cooking Pads
• COOK TIME – selects the time to cook.
• STOP TIME – selects the time of day the oven
is to automatically turn off.
8 . Number Pads – 1 through 0 – select a time of
day, temperatures, cook and stop time, or timer(s).
9 . START – touch this pad to complete a timed
entry or any oven mode.
10.
Oven Mode Pads
• FAST PREHEAT
• BAKE
• ROAST
• BROIL
• CONVECTION
• CONVECTION BAKE
• CONVECTION ROAST
• CONVECTION BROIL
• PROBE
• WARM
• PROOF
• DEHYDRATE
11.
Display Window
• Displays the time of day.
• Displays timer(s) countdown.
• Displays Panel Lock and Probe icons when ac-
tivated.
• Displays selected modes, numbers, symbols
and scrolling messages.
SPECIAL FEATURES and INDICATORS
• Sabbath Mode – complies with the Sabbath
requirement. See Page 27.
• 12- or 24-hour Clock Choice – oven can have a
12-hour or 24-hour clock. See Page 33.
• Fahrenheit or Celsius – switch temperature scale
to Fahrenheit or Celsius. See Page 34.
• Volume – decrease or increase loudness of control
panel tones. See Page 8.
• Calibrating Oven Temperature – used to calibrate
the oven temperature. See Page 34.
• Default Temperature Settings – The cooking modes
automatically select a suitable temperature. These
can be changed when a different one is needed.
1
* Control Shown is for a Double Oven
6
NOTE: In the event of a power failure, these
functions return to the factory
settings and will need to be reset.


