


THE FOODSAVER USER MANUAL
30
Your FoodSaver vacuum packaging
system also protects non-food items
from oxidation, corrosion and
moisture.
Just follow the directions
for vacuum packaging using the
FoodSaver Bags or accessories.
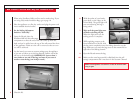
◗ Vacuum package your silver.
Without exposure to air, the silver
will not tarnish. Be sure to cover
fork tines in something cushioning,
like a paper towel, so they won’t
puncture the bag.
◗ Vacuum package your children’s
clay so that it won’t dry out and
get cracked.
◗ Camping and hiking gear stays
dry and compact. Vacuum pack-
aging your clothes and equipment
will help save space in your pack.
Vacuum package matches, maps
and anything you want to stay dry.
◗ For picnics, fill a FoodSaver Bag
with ice and seal. When it melts,
you’ll have fresh water for drink-
ing or you can put it back in the
freezer as a reusable ice pack.
◗ Vacuum package your food and
equipment for a boating or sailing
outing. Food will stay dry in the
cooler, batteries and film won’t get
damaged by water and you’ll appre-
ciate having a dry change of clothes.
◗ FoodSaver Bags are also great for
storing extra keys or any spare parts
you need for your boat. They will
be dry and in one place.
◗ Vacuum package first aid kits and
emergency kits for your house,
your boat and your car. Items will
all be in one package and will stay
dry and without dirt and mold.
Include flares, batteries, flashlight,
candles and matches.
◗ Vacuum package extra spark plugs
and precision tools that always
seem to get lost. Seal nuts, bolts
and screws by size in separate bags.
Vacuum Packaging Non-Food Items Troubleshooting
THE FOODSAVER USER MANUAL
31
Nothing Happens When the Lid is Pressed:
1
Make sure the power cord is firmly plugged into the electrical outlet.
2 Make sure the power cord is not damaged in any way.
3 Make sure the electrical outlet is operative by plugging in
another appliance.
4 Wait 20 minutes to allow the appliance to cool off, and then try
using it again. The appliance will shut off automatically if it
becomes too hot. To keep the appliance from becoming too hot:
a. Wait at least 20 seconds for the appliance to cool down after
vacuum packaging and/or sealing before attempting to vacuum
and/or seal another bag.
b. Keep the lid open before vacuuming and/or sealing another bag
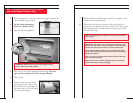
Air Is Not Removed From the Bag:
1
Make sure the open end of the bag is resting entirely inside the
Vacuum Channel. Make sure you are not putting the edge of the
bag beyond the Vacuum Channel.
2 Make sure the Sealing Adjustment Switch is in the “Vacuum &
Seal” or “Extended Seal” position.
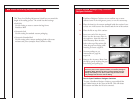
3 Check the bag for leaks. Seal the bag with some air in it. Submerge
it in water and apply pressure. Bubbles indicate a leak. If the bag
has a leak, you need to use a new bag.
4 If using a custom-sized FoodSaver Bag, check the seal of the bag.
There may be a wrinkle in the bag along the seal, which causes
leakage and prevents air from being removed. Cut the bag and
reseal the edge.
5 Do not attempt to make your own side seams for a FoodSaver
Bag. They are manufactured with special side seams, which are
sealed all the way to the outer edge. Making your own side seams
may leave air pockets, which will cause leakage and prevent air
from being completely removed.