


15
CLASSIC BASIL, PARSLEY AND SPINACH-WALNUT
PESTOS
Each pesto recipe will provide enough sauce for 2 pounds of pasta, or
freeze some and have it next week.
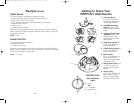
Method for each recipe:
•Toast pine nuts (pignoli), walnuts or sesame seeds until golden brown
before using them. (Buy nuts a handful at a time from the bulk bins.)
•Heat oil and garlic in small pan on low heat or in microwave, 30 sec-
onds on high, before using.
• Pulse all ingredients in processor until paste forms.
• Serve over hot pasta, but never heat the pestos themselves. Pestos
should be used at room temperature.
CLASSIC BASIL PESTO
1 cup EVOO - extra virgin olive oil
4 cloves garlic, popped from skin and cut in half
1/2 pound, about 2 3/4 cups, grated Parmigiano Reggiano cheese,
a couple of handfuls
6 ounces pine nuts (a handful)
2 bunches basil, about 80 to 100 leaves or 2 cups
PARSLEY PESTO
1 cup EVOO - extra virgin olive oil
4 cloves garlic, popped from skin and cut in half
1/2 pound, about 2 3/4 cups, grated Parmigiano Reggiano or Romano
cheese, a couple of handfuls
6 ounces walnut pieces (a handful)
2 bunches fresh flat-leaf parsley, tops ripped away from stems
SPINACH-WALNUT PESTO
1 cup EVOO - extra virgin olive oil
4 cloves garlic, popped from skin and cut in half
2 cups fresh spinach leaves, packed down, or 1 cup drained, defrosted
frozen chopped spinach
6 ounces walnut pieces (a handful)
4 pinches ground nutmeg
1/2 pound, about 2 3/4 cups, grated Parmigiano Reggiano or Romano
cheese, a couple of handfuls
10
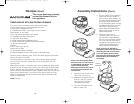
Instructions for Use (Cont)
Chopping Continued
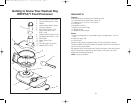
5. Make sure unit is in the OFF position; then plug the Food Processor
into a 120V AC electrical outlet.
6. Turn the Speed Control Dial to the desired speed setting.The Indicator
Light will come on. If processing slows or seems labored, increase the
Speed Control Dial from 1 to 2 or turn to OFF and select the Pulse
setting. Additional ingredients may be added through the Feed Chute
while processing.
Caution: Never use fingers or other utensils to push food down
the Feed Chute. Always use the Food Pusher.
7. When finished processing, move the Speed Control Dial to OFF, the
Indicator Light will go off, and unplug the unit.
Note: This Food Processor is equipped with an automatic
brake that will stop the rotation of the Blade within seconds.
Although this automatic brake provides an additional measure
of safety, make sure that the Blade has completely stopped
before you remove the Cover or unplug the unit.
8. Turn the Cover clockwise to disengage the locking tabs and lift the
Cover from the Processing Bowl.
9. Carefully lift the Chopping Blade from the Processing Bowl.
10. Turn the Processing Bowl handle clockwise to disengage the locking
tabs and lift the bowl from the Power Base.
11. Remove contents from the Processing Bowl and the Chopping Blade
with the Spatula.
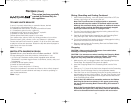
This recipe has been specially
created by Rachael Ray for
this appliance.
TM
RACHAEL RAY_RRFP1AT_IB_22-6-06 6/22/06 5:12 PM Page 19