


8 17
This recipe has been specially
created by Rachael Ray for
this appliance.
ITALIAN ROASTED RED PEPPER HUMMUS
2 (14 ounces) cans chick peas (garbanzo beans), drained
4 roasted red peppers, or 1 (15 ounce) jar roasted bell peppers, drain and
pat dry
2 sprigs fresh rosemary leaves stripped from stems
2 cloves garlic, cracked away from skin
4 pinches of crushed red pepper flakes
2 splashes of water, about 2 tablespoons
4-6 tablespoons EVOO - extra virgin olive oil, eyeball it
Salt and pepper, to taste
Specialty potato chips, sesame melba rounds, or toasted bread rounds
for dipping
Place chick peas, red peppers, rosemary, garlic, and red pepper flakes in
processor and grind on Speed 2 into a thick paste. Add water a splash at
a time and reprocess. While processor is on, stream in EVOO to form a
smooth dip. Season the dip with salt and pepper, to your taste. Transfer
dip to a small bowl and serve with dippers of choice.
Yield: 4 cups
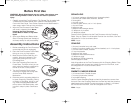
Instructions for Use
Slicing, Shredding and Grating
CAUTION: Always unplug Food Processor from outlet before
installing or removing attachments.
CAUTION: Use extreme care when handling the Slicing,
Shredding or Grating Blades. Do not touch the cutting edges with
your fingers. The cutting edges are very sharp and can cause
injury if touched.
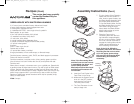
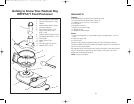
1. Make sure the unit is unplugged. Remove Storage Tray from the
Processing Bowl as outlined in the BEFORE FIRST USE section of
this Owner's Manual. Keep the Storage Tray out of the way, where it
cannot be tipped over and make sure the Tray and all Blades are out
of the reach of children. Attach the Processing Bowl to the Power
Base. See ASSEMBLY INSTRUCTIONS for details.
2. Insert a Slicing, Shredding or Grating Blade into the Blade Holder. See
Assembly Instructions for specific details.
3. Insert the Blade Holder and Stem in the Processing Bowl over the
Drive Shaft.
4. Place the Cover on the Processing Bowl with the locking extension at
approximately the nine o'clock position. Turn the Cover counter clock-
wise to engage the locking tabs and the Upper Interlock Mechanism
in the Processing Bowl handle.
Note: If the Lid is difficult to assemble, make sure the Rubber
Seal Ring fits flat and not twisted, in the upper groove along
the top of the Processing Bowl. Remove Ring and reattach if
necessary.
Note: If the Processing Bowl and the Cover are not correctly
assembled, the Upper and Lower Safety Interlock Mechanism
will not be closed and the Food Processor will not function.
5. Make sure unit is in the OFF position; then plug the Food Processor
into a 120V AC electrical outlet.
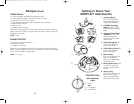
6. Remove the Food Pusher and insert the food to be processed into
the Feed Chute (see Food Processing Hints for food preparation
details). Turn the Speed Control Dial to desired speed; the Indicator
Light will come on. Use even, constant pressure on the Food Pusher
to feed food into the Feed Chute. If processing slows or seems
labored, increase the Speed Control Dial from 1 to 2 or turn to OFF
and select the Pulse setting. Note: Do not use excessive force or you
will damage the Food Processor.
Caution: Never use fingers or other utensils to push food down
the Feed Chute. Always use the Food Pusher.
TM
RACHAEL RAY_RRFP1AT_IB_22-6-06 6/22/06 5:12 PM Page 15