


18
Recipes (Cont.)
This recipe has been specially
created by Rachael Ray for
this appliance.
GREEN WRAPS WITH WHITE BEAN HUMMUS
2 (15 ounce) cans cannelloni beans, drained and rinsed
4 stems fresh rosemary, leaves stripped from stem
2 cloves garlic, popped from skin
3-4 tablespoons EVOO - extra virgin olive oil, eyeball it
Black pepper, to your taste
4 firm vine-ripened tomatoes, thinly sliced
1/2 seedless cucumber, thinly sliced
1/2 red onion, thinly sliced
A couple handfuls pitted Kalamata olives
A couple of handfuls chopped fresh flat-leaf parsley
1/2 pound mixed greens
2 lemons
EVOO - extra virgin olive oil
Coarse salt, to taste
1/2 pound feta cheese, crumbled
8 large pita breads, or flour tortilla wraps, or flavored wraps
Combine beans, rosemary, garlic, EVOO, and black pepper in processor.
Pulse until mixture is smooth.
Combine tomatoes, cucumber, onion, olives, parsley, greens, and the
juice of lemons in a bowl. Drizzle with olive oil, and sprinkle with salt.
Combine well.
Warm pitas or wraps in microwave oven or on a griddle pan. Spread with
a generous dose of white bean hummus. Top with a layer of Greek salad
mixture. Sprinkle with Feta cheese crumbles and roll. Wrap lower half of
wraps with foil or waxed paper to keep it together while you eat your way
down. Keep a paper towel in your hand as you eat to catch any drips.
Batches of white bean spread are also a terrific dip for specialty chips,
celery, or bread sticks.
Yield: 8 wraps
7
Note: If the Processing Bowl
and the Cover are not correct-
ly assembled, the Upper and
Lower Safety Interlock
Mechanism will not be closed
and the Food Processor will
not function.
9. Insert the Food Pusher in the
Feed Tube on the Cover.
10. Make sure the Speed Control
knob is in the OFF position,
then plug the Cord into a
120V AC power outlet.
11. The Food Processor is now
ready to begin use.
Assembly Instructions (Cont.)
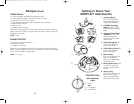
7. To chop foods, fit the Chopping
Blade over the Drive Shaft. To
slice, shred or grate cheese, use
the Blade Holder Assembly (with
the proper Blade Attachment).
To use the Blade Holder, first slip
the Blade Holder Stem over the
Drive Shaft. Using the finger
holes, attach the Blade Holder
(sharp cutting edge up) to the
Blade Holder Stem. .
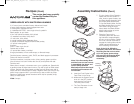
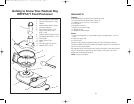
8. Place the Cover on the
Processing Bowl with the lock-
ing extension at approximately
the nine o'clock position. Rotate
the Cover counter clockwise to
engage the locking tabs and the
Upper Interlock Mechanism in
the Processing Bowl handle.
Note: If the Lid is difficult to
assemble, make sure the Rubber
Seal Ring fits flat and not twist-
ed, in the upper groove along
the top of the Processing Bowl.
Remove Ring and reattach if
necessary.
Locking
Extension
TM
RACHAEL RAY_RRFP1AT_IB_22-6-06 6/22/06 5:12 PM Page 13