


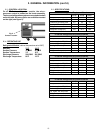
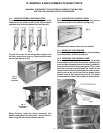

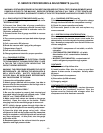
III. e - DRAWER GASKETS:
To remove the gasket to be replaced, grasp it firmly by
one corner and pull it out. Before attempting to install
a new gasket, both the unit and the gasket itself must
be at room temperature. Insert the four corners first
by using a rubber mallet (or hammer with a block of
wood). After the corners are properly inserted, work
your way towards the center from both ends by gently
hitting with a mallet until the gasket is completely
seated in place (see figure 9 for gasket cross section).
NOTE: The gasket may appear too large, but if it is
installed as indicated above it will slip into place.
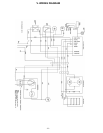
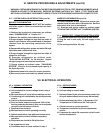
III. f - THE MICROPROCESSOR CONTROL:
To remove the microprocessor controller from the unit
in which it was installed, please refer to section “V” of
your INTELA-TRAUL
®
Master Service Manual.
III. g - DRAIN PAN:
To remove the drain pan, begin by removing the
evaporator housing cover as outlined in section “III.
c.” Next, remove the screws and brackets which
secure the drain pan, and remove the drain tube from
the drain pan. Finish by sliding the drain pan out from
under the coil.
Reverse the procedure to install.
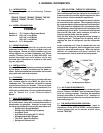
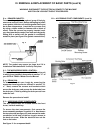
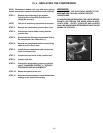
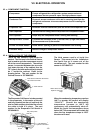
III. h - ACCESSING START COMPONENTS:
The start components are located behind the front
louver, inside a metal tray.
To access the start components, first remove the
louver assembly as shown in section III. a. Next loosen
the top set screw (see figure 10). and remove the molex
connection in the back of the box to gain access to
the back set screw. Slide the electrical box out the
font on its tracks.
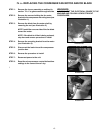
See figure 11 for component detail.
III. h - ACCESSING START COMPONENTS (cont’d):
-5-
III. REMOVAL & REPLACEMENT OF BASIC PARTS (cont’d)
WARNING: DISCONNECT THE ELECTRICAL POWER TO THE MACHINE
AND FOLLOW LOCKOUT/TAGOUT PROCEDURES.
Fig. 9
Fig. 10
Fig. 11