


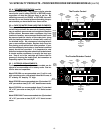
V. a - ADJUSTING THE SHELVES:
For shelves mounted on pins, first select the desired
location and remove the white plastic covers in the
interior back and sides by rotating them counter-clock-
wise. Remove the shelf pins by rotating them counter-
clockwise. Install the pins in the desired location by
rotating clockwise. Make sure the pin is securely tight-
ened down. Do not over tighten. Slide the shelf into
its new position, and replace the white plastic covers
into the holes vacated by the shelf pins.
VI. OTHER
VI. a - SERVICE INFORMATION:
Before calling for service, please check the following:
Is the electrical cord plugged in?
Is the fuse OK or circuit breaker on?
Is the power switch “ON”?
If after checking the above items and the unit is still
not operating properly, please contact an authorized
Traulsen service agent. A complete list of authorized
service agents was provided along with your Traulsen
unit. If you cannot locate this, you may also obtain the
name of a service agent from the Tech Service page of
our website: www.traulsen.com.
If service is not satisfactory, please contact our in-
house service department at:
Traulsen & Co., Inc.
4401 Blue Mound Road
Fort Worth, TX 76106
(800) 825-8220
Traulsen & Co., Inc. reserves the right to change speci-
fications or discontinue models without notice.
VI. b - SPARE PARTS:
Spare or replacement parts may be obtained through
a parts supplier or one of our authorized service agents.
A complete list of authorized service agents accompa-
nies this manual and is also posted on our company’s
official website @ www.traulsen.com.
VI. c - WARRANTY REGISTRATION:
For your convenience, the warranties on your new
Traulsen unit may be registered with us by one of two
methods. Completing the enclosed warranty card
(shipped with the unit), or by filling out the on-line
warranty registration form located on the Technical Ser-
vice page of our website (www.traulsen.com).
-5-
IV. CARE & MAINTENANCE (cont’d)
IV. b - HINGE REPLACEMENT:
door units, the top hinge(s) contains a microswitch
for controlling the interior lighting.
To reassemble the hinge reverse the previous proce-
dure.
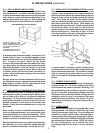
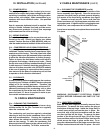
IV. c - REPLACING THE GASKETS:
To remove the gasket to be replaced, grasp it firmly
by one corner and pull it out. Before attempting to
install a new gasket, both the unit and the gasket it-
self must be at room temperature. Insert the four cor-
ners first by using a rubber mallet (or hammer with a
block of wood). After the corners are properly inserted,
work your way towards the center from both ends by
gently hitting with a mallet until the gasket is com-
pletely seated in place (see figure 8 for proper gasket
placement).
NOTE: The gasket may appear too large, but if it is
installed as indicated above it will slip into place.
IV. d -
CLEANING THE EXTERIOR:
Exterior stainless steel should be cleaned with warm
water, mild soap and a soft cloth. Apply with a damp-
ened cloth and wipe in the direction of the metal grain.
Avoid the use of strong detergents and gritty, abra-
sive cleaners as they may tend to mar and scratch the
surface. Do NOT use cleansers containing chlorine,
this may promote corrosion of the stainless steel.
Care should also be taken to avoid splashing the unit
with water, containing chlorinated cleansers, when
mopping the floor around the unit.
For stubborn odor spills, use baking soda and water
(mixed to a 1 TBSP baking soda to 1 pint water ratio).
IV. e - CLEANING THE INTERIOR:
For cleaning both stainless steel and anodized alumi-
num interiors, the use of baking soda as described in
section “IV. d” is recommended. Use on breaker strips
as well as door gaskets. All interior fittings are re-
movable without tools to facilitate cleaning.
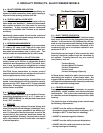
V. MISC. OPERATIONS
Fig. 8
Inside Door Panel
Gasket Assembly
Vertical Gasket
Retainer