


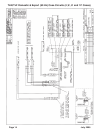

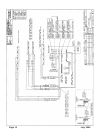

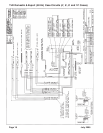
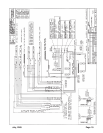

TLM, TLF, TLD
Page 22
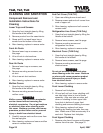
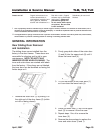
CLEANING AND SANITATION
Component Removal and
Installation Instructions for
Cleaning
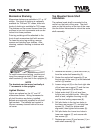
Lower Trays and Screens
1. Open the front straight glass by lifting
the handle at the bottom.
2. Remove product from the case interior.
3. Grasp and lift out each lower tray or
screen from the bottom of the case.
4. After cleaning, replace in reverse order.
Front Air Ducts
1. Remove lower trays or screens, see
this page.
2. Lift out front air duct sections.
3. After cleaning, replace in reverse order.
Rear Air Ducts
1. Remove lower trays or screens, see
this page.
2. Remove mounting screws from rear
air duct.
3. Lift out rear air duct sections.
4. After cleaning, replace in reverse order.
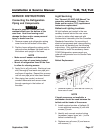
Mullion Covers
1. Open the front straight glass by lifting
the handle at the bottom.
2. Remove mounting screws from each
mullion cover.
WARNING
Mullion covers with electrical receptacles
can be cleaned without removing the
electrical receptacles. Do not get moisture
on electrical wires when cleaning under
this cover. Moisture on wires could cause
premature product failure and/or personal
injury or death from electrical shock.
3. Carefully remove each mullion cover from
the rear uprights.
4. After cleaning, replace and secure mullion
covers in reverse order.
End Coil Cover (TLM/TLF)
1. Open rear sliding doors at each end.
2. Remove screws and end coil covers from
ends of upper coil.
3. After cleaning, replace end coil covers in
reverse order.
Refrigeration Line Cover (TLM Only)
1. Open the front straight glass by lifting the
handle at the bottom.
2. Remove lower screens, see this page.
3. Remove mounting screws and
refrigeration line cover.
4. After cleaning, replace in reverse order.
Electrical Cover (TLM Only)
1. Open the front straight glass by lifting
the handle at the bottom.
2. Remove lower screens, see this page.
3. Remove mounting screws and
electrical cover.
WARNING
Do not get moisture on electrical wires
when cleaning under this cover. Moisture
on wires could cause premature product
failure and/or personal injury or death
from electrical shock.
4. After cleaning, replace in reverse order.
Front Lower Cladding
1. Remove front kickplate.
2. Lift and pull out front lower cladding until
rear tabs clear holes in front of frame
assembly. After rear tabs are clear, pull
down on cladding to clear upper tabs
from slots in bottom of upper front
cladding and remove cladding from case.
3. After cleaning, replace front lower
cladding by inserting top tabs, then rear
tabs. Make sure all tabs are securely fit in
each slot. Replace front kickplate.
Front Upper Cladding
1. Remove color band, bumper and bumper
retainer from the case. See page 31.
April, 2007