


2015WC/2015WCOL Wine Captain
®
www.U-LineService.com 14 02/2005
™
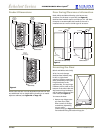
Anti-Tip Bracket Installation
1. Locate two Anti-Tip Brackets included inside the unit.
2. Place the unit into the area where it will be installed.
Check the door, sides and top for a proper fit. Also test
to make sure the door opens and closes freely.
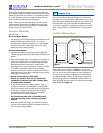
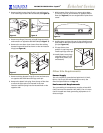
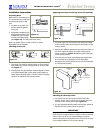
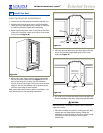
3. Remove grill and place a mark on the floor at the front
of the unit. Also place a mark on the floor in the center
of the unit. See
Figure 30
.
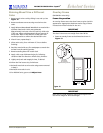
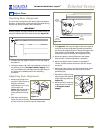
4. Remove the unit. Using a square, extend a centerline
20-1/4" toward the back wall. See
Figure 31
. At the
back of the centerline, mark a line that measures
6-9/16" to the left and right. This line serves as the back
edge for the Anti-Tip Brackets and its furthest points
mark the outer edge of each bracket.
Note: Instructions are shown for built-in installation. Use
same dimensions for free-standing installation.
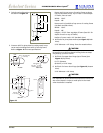
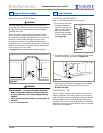
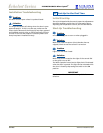
5. Place the Anti-Tip Brackets on the floor against the line
drawn for the outer edge. Mark spots for the screw
holes. See
Figure 32
.
6. Use a 1/8" drill to make two starter holes and fasten the
Anti-Tip Brackets to the floor using the screws provided.
CAUTION
Other hardware is required for floors made of materials
other than wood.
7. Place the unit back into position, making sure the feet
engage the Anti-Tip Brackets properly. Check the
alignment of the lines made on the floor in Step 3 with
the position of the front feet to ensure proper
positioning.
8 Install the Unit
Marks on Floor
Figure 30
20
-
1/4"
6
-
9/16" 6
-
9/16"
Back
Wall
Centerline
Marks
on Floor
Line Marks
Back
of Unit
Front
of Unit
Figure 31
Back
Wall
Back
of Unit
Drill Holes and
Mount Anti-Tip
Brackets to Floor
Front
of Unit
Figure 32