


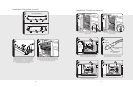

IMPORTANT–Please Read and Follow!
3
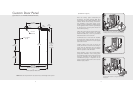
Site Preparation
It is recommended that a thorough site inspection be
conducted PRIOR to unpacking and moving this appliance.
WARNING
Make sure that incoming voltage is the
same as unit rating. An electric rating
plate specifying voltage, hertz, and amps
is attached to the product. Wiring the
dishwasher with more voltage than it is
rated for may cause severe damage. To
reduce the risk of fire, electric shock, or
injury to persons, installation work and
electrical wiring must be done by qualified
technician in accordance with all
applicable codes and standards, including
fire-rated conditions.
WARNING
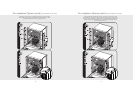
The dishwasher door may not stay open
by itself until the door panel is installed.
Be aware of this when fastening the
dishwasher to the cabinet.
WARNING
Plumbing connections must comply with
applicable sanitary, safety and plumbing
codes.
WARNING
Electrical power must be turned off at
circuit breaker or fuse box before making
electrical connections. Disconnect the
electrical power supply and place a tag at
the disconnect switch indicating that you
are working on the circuit.
• Before beginning–please read these
instructions completely and carefully.
• Do not remove permanently affixed labels,
warnings, or rating plates from the
dishwasher. This may void warranty or
create an unsafe product.
• Please observe all national and local
codes.
• Please ensure that this product is properly
grounded.
• The installer should leave these
instructions with the consumer who should
retain for local inspector’s use and for
future reference.
• The dishwasher has a factory installed
backflow preventer. Do not add an
additional check valve.
• Failure to provide a 20” above floor level
(50.8 cm) high loop may result in improper
operation of the dishwasher.
• Remove pallet screws from base. Damage
could occur to dishwasher if screws are not
removed.
Table of Contents
Warnings & Important Information ______________________________________ 3
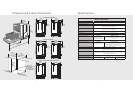
Dimensions & Cutout Dimensions ______________________________________ 6
Specifications ________________________________________________________ 7
Custom Door Panel Specifications ______________________________________ 8
Custom Door Panel Installation Option _________________________________ 9
General Information _________________________________________________ 10
Site Preparation __________________________________________________ 10
Water Supply ____________________________________________________ 10
Drain____________________________________________________________ 10
Electrical Connections ____________________________________________ 11
Hardwire Conduit Option _____________________________________________ 12
Trim Installation Options _____________________________________________ 13
Counter Balance Spring Adjustment ___________________________________ 16
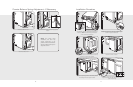
Installation Procedure_________________________________________________ 17
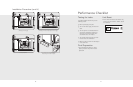
Performance Checklist _______________________________________________ 21
Testing for Leaks _________________________________________________ 21
Final Preparation _________________________________________________ 21
Service & Registration ________________________________________________ 22
2