


3736
Programming Modes
Programming Modes
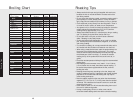
The meat probe takes the guesswork out
of roasting by cooking foods to the ideal
internal temperature. The probe setting is
used to automatically turn the oven off
when meat reaches its optimal internal
temperature. Your Viking oven’s built-in
probe will help you prepare meats exactly
as you want them.
Meat Probe Use and Care
• Use of probes other than the one provided with your oven
may result in damage to the probe.
• Use the handles of the probe and plug when inserting and
removing them from the meat and outlet.
• To avoid damaging your probe, never use tongs to pull on the
cable when removing.
• To avoid breaking the probe, make sure food is completely
defrosted before inserting.
• To prevent possible burns, do not unplug the probe from the
outlet until the oven has cooled.
• Never leave the probe inside the oven during a self-cleaning
cycle.
• Never store the probe inside the oven.
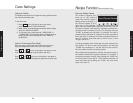
To Insert the Meat Probe:
After preparing the meat and placing it on the broiler pan, follow
these steps for proper probe placement:
1. Lay the probe on the outside of the meat along the top or
side and use your finger to mark where the edge of the meat
meets the probe. The point where they meet should rest in
the center of the thickest, meatiest part of the roast.
2. Insert the probe completely into the meat. It should not touch
the bone, fat, or gristle.
• For roasts with no bone, insert the probe into the meatiest
part of the roast.
• For bone-in ham or lamb, insert the probe into the center
of the lowest large muscle or joint.
• With a whole turkey, insert the probe into the meatiest part
of the inner thigh from below and parallel to the leg.
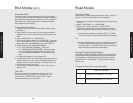
Plug
Cable
Probe
Handles
Auto Roast
Use this function to simplify roasting by automatically searing the
outside of roasts. To use Auto Roast:
1. Arrange the oven racks in the desired positions before heating
the oven.
2. Select “UPPER OVEN” or “LOWER OVEN.”
3. Set the Oven Function Selector to “AUTO ROAST.”
Temperature display flashes a preset temperature of 325º F.
4. Set the temperature using one of the following two methods:
a. Confirm preset temperature, press “SET” or
“ENTER.” The oven will begin TruConvec™ Preheat
immediately.
OR
b. Change the temperature by typing the desired
temperature on the numeric keypad or using the up
and down arrow keys. Press “SET” or “ENTER” when
finished. The oven will begin TruConvec™ Preheat
immediately.
During Auto Roast Preheat
The display will alternate between showing the set roasting
temperature and the actual preheat temperature every 5 seconds.
When Set Auto Roast Temperature Is Reached
One long beep will sound and the display will show “SEARING.”
The oven will remain at searing temperature (set temperature plus
100º F) for 30 minutes. If set, the Cook Time timer will begin.
To Turn Off Oven:
Press the “OFF” button on the control panel display for the oven
you are using. One beep will sound and the oven will turn off.
Roast Modes
Meat Probe (Available on Premiere Models)