


3938
Cooking Tips
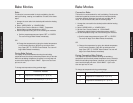
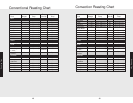
Rack Positions
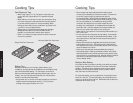
Each oven is equipped with three tilt-proof racks. Premiere
models have two standard tilt-proof racks and one TruGlide™
rack. With the TruGlide™ rack, the bottom section remains in the
oven and the top section smoothly glides outward when pulled.
This reduces the chances of spills from items that contain juice or
liquid. This rack can be used in any of the six rack positions.
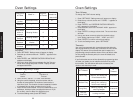
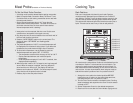
All ovens have six rack positions. Position 6 is the farthest from the
oven bottom. Position 1 is the closest to the oven bottom. The
racks can be easily removed and arranged at various levels. For
best results with conventional baking, do not use more than one
rack at a time. It is also recommended, when using two racks, to
bake with the racks in positions 2 and 4 or positions 3 and 5.
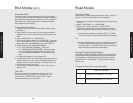
1. Arrange the oven racks in the desired positions BEFORE
heating the oven. If cooking on two racks at the same time,
use rack positions 2 and 4 or positions 3 and 5.
2. Turn the Oven Function selector to desired function. Cooking
starts immediately and stops when the Oven Function selector
is turned to OFF.
3. Set the Temperature Control to the desired temperature.
4. Place food in the oven after the Oven indicator light goes out.
SETSET
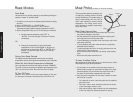
Position 6
Position 1
Position 2
Position 3
Position 4
Position 5
To Set the Meat Probe Function:
• A cooking mode must be selected before setting meat probe.
• Bake, Convection Bake, Convection Roast, TruConvec™, and
Convection Broil are the cooking modes that can be used with
the meat probe function.
• Set the internal temperature about 10° F lower than the
actual desired internal temperature. The meat will continue to
cook when removed from the oven and will reach desired
internal temperature while “standing.”
1. Insert probe into the meat and slide into oven. Double oven
models have a meat probe in the upper oven only.
2. Plug the probe into the outlet located on the left interior wall of
the oven and close the oven door.
3. Press the “MEAT PROBE” button on the control panel. The
display will show “SET PROBE” and flashing preset
temperature.
4. The preset temperature of 160º F or a stored temperature will
be displayed on the electronic timing center. If you desire this
temperature, the probe mode will begin after 10 seconds.
5. To set another temperature, use the keypad to enter the
desired temperature and press “SET” or “ENTER.”
• The temperature must be within the range of 120º to 190º F.
• Display alternates between cook mode and probe
temperature.
• Probe temperature displays LO until 100º F is reached, then
displays actual temperature.
6. When the probe is within 10º F of setpoint, two long beeps will
sound. When the setpoint is reached, three long beeps will
sound and the oven will turn off. The display will alternate
between cook mode and “DONE.” One short beep will sound
every minute until the probe function is closed.
7. Press any key to close the probe function.
Meat Probe (Available on Premiere Models)
Cooking Tips
Programming Modes