


1312
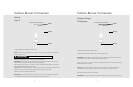
Griddle Conversion
(for models equipped with griddle)
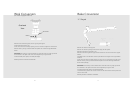
U-Shape Burner with Spark Ignition
Locate bag labeled Griddle Orifice.
Remove screws securing griddle venturi plate to griddle box and remove griddle venturi plate.
Remove screws securing griddle burner to burner box.
Loosen air shutter screw and adjust opening on burner to 7/16” and tighten air shutter screw.
Use a 1/2” deep socket wrench to remove orifice by turning counterclockwise.
IMPORTANT: If a valve pin is present, remove valve pin and discard.
Install orifice from bag labeled Griddle Orifice.
IMPORTANT: The orifice tip must be located 3/16” inside the burner for proper gas mixture
and combustion. The depth of the orifice can be adjusted by turning the orifice
counterclockwise (more depth) or clockwise (less depth).
Reverse procedures as needed to reassemble.
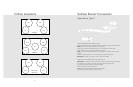
Air Shutter
Set Screw
Orifice
Hood
Air Shutter
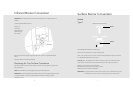
Griddle Conversion
(for models equipped with griddle)
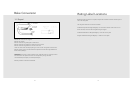
Straight Tube Burner with Spark Ignition
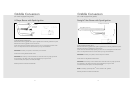
Locate bag labeled Griddle Orifice.
Remove screws securing griddle venturi plate to griddle box and remove griddle venturi plate.
Remove screws securing griddle burner to burner box.
Loosen air shutter screw and adjust opening on burner to 7/16” and tighten air shutter screw.
Use a 1/2” deep socket wrench to remove orifice by turning counterclockwise.
IMPORTANT: If a valve pin is present, remove valve pin and discard.
Install orifice from bag labeled Griddle Orifice.
IMPORTANT: The orifice tip must be located 3/16” inside the burner for proper gas mixture
and combustion. The depth of the orifice can be adjusted by turning the orifice
counterclockwise (more depth) or clockwise (less depth).
NOTE: If necessary, repeat steps for 2
nd
burner located on 24” griddles.
Reverse procedures as needed to reassemble.
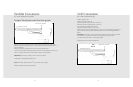
Screw (Front of Burner)
Screw (Rear of Burner)