


– 6 –
INSTALLATION
UNPACKING
Immediately after unpacking, check for possible shipping damage. If the range is found to be damaged, save
the packaging material and contact the carrier within 15 days of delivery.
Remove all shipping wire, wood blocking, and accessories. Uncrate the high shelf, backguards and/or broiler.
Before installing, verify that the electrical service agrees with the specifications on the rating plate located behind
the kick panel on the left side. If the supply and equipment requirements do not agree, contact your dealer or
Vulcan-Hart immediately.
LOCATION
The installation location must allow adequate clearance for servicing and proper operation. A minimum front
clearance of 40" (1016 mm) is required. 0" sides and rear clearance from combustible and non-combustible
construction is required except when hot top sections are incorporated. Ranges incorporating hot top sections
require a 0" sides and rear clearance form non-combustible construction and 6" from combustible construction.
INSTALLATION CODES AND STANDARDS
Your Vulcan range must be installed in accordance with state and local codes, or in the absence of local codes,
with National Electrical Code ANSI/NFPA-70 (latest edition) available from The National Fire Protection
Association, Batterymarch Park, Quincy, MA 02269. In Canada refer to Canadian electrical code C22.1 Part 1
(latest edition).
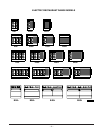
ASSEMBLY
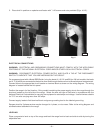
Model ESB Broiler/Backguard
In E36L and E60L Series, slide the legs of the broiler inside the channels provided in the back of the range (in
E60L Series, the broiler is mounted between the center and the right-hand channel), until the two holes on each
side line up. Fasten with the bolts and nuts provided.
In a similar way, mount the backguard to the left side of the broiler.
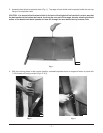
High Shelf
The high shelf for this range is shipped knocked down and is included in the range crate. The splasher back and
heat shield are bolted together and shipped attached to the rear of the range. The hardware required to assemble
the shelf is packed in the oven.
1. Remove the splasher back and heat shield from the rear of the range.
2. Remove the heat shield from the splasher back by removing two sheet metal screws.