


— 7 —
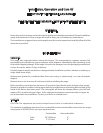
CONNECTION OF MANIFOLDS IN BATTERY
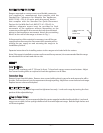
Two or more ranges can be coupled together at the manifold by removing the front control panel to
make necessary connections. Be sure to cap open ends. To connect:
1. Adjust manifold by loosening U-bolts. In a large battery of eight or more ranges, gas should
be fed from both ends of the battery. "T" gas connections can be installed whenever necessary
for increased gas supply. For further details, consult your gas company. The top roll front may
also be removed for your convenience.
2. Bolt risers together at top rear.
3. If risers have high shelves, bolt the high shelf brackets together. Replace the high shelves.
4. Use clamp to pull ranges together at the rear. (There is a slotted hole in the top frame side at
the rear that can be used to bolt ranges together if necessary. Run a
5
/16" (8 mm) diameter drill
through the slotted hole, drilling from inside out on each range.) Use
1
/4" (6 mm)-2 x 2" (51 mm)
bolt that is provided.
5. Replace all top sections. Make manifold union connections at the front. Do not allow manifold
pipe to turn.
6. Bolt the roll front ends together at the front. (Make sure roll fronts match.) Use
1
/4" (6 mm)-20
x 1" (25 mm) bolts provided.
7. Tighten the front roll front bolts after the roll front ends have been properly bolted together.
8. Before replacing manifold panels, check all gas connections for leaks. (See GAS
CONNECTIONS in this manual.)
If appliance has rear gas connection, carefully check for open gas lines.
The gas pressure regulator must have proper outlet pressure capacity for this battery application.
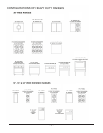
INSTALLING OVERLAPPING GRIDDLE TOP
1. Bolt ranges together and level per instructions in this manual.
2. Remove chrome bull noses from ranges receiving overlapping griddle tops. Bull noses are held
by bolts on the bottom side.
3. MANUAL CONTROLS ONLY — Set griddle tops in place and level with bolts located under the
griddle top in both rear corners. Should you desire griddle plate to slope forward, adjust
accordingly. Make sure hole in front gutter ts into drain in range. Reinstall bull noses.
4. THERMOSTAT CONTROL ONLY — Set griddle top in place and support front with 4" to 6" (102
to 152 mm) blocks. Insert thermostat probe into smaller of two angles on bottom of griddle top
(bend probe slightly while inserting to hold in place). Slide insulation sleeving around probe
lead up to angle on griddle top. Coil excess lead near thermostat, leaving as little as possible
in burner area. Make sure that thermostat probe lead is not over burner or pilot ame. Remove
supporting blocks and lower griddle top in place.
Level griddle top with bolts located under both rear corners. Should you desire griddle plate
to slope forward, adjust accordingly. Make sure hole in front gutter ts into drain in range.
Reinstall bull noses.
Leveling bolts are provided under each griddle plate at the rear, should you desire griddle plate to slope
forward. Top frame sealing channels are supplied to seal o any space between two or more ranges.