


– 7 –
ELECTRICAL CONNECTIONS
WARNING: ELECTRICAL AND GROUNDING CONNECTIONS MUST COMPLY WITH THE
APPLICABLE PORTIONS OF THE NATIONAL ELECTRICAL CODE AND/OR OTHER LOCAL
ELECTRICAL CODES.
WARNING: DISCONNECT ELECTRICAL POWER SUPPLY AND PLACE A TAG AT THE DISCONNECT
SWITCH INDICATING THAT YOU ARE WORKING ON THE CIRCUIT.
WARNING: APPLIANCES EQUIPPED WITH A FLEXIBLE ELECTRIC SUPPLY CORD ARE
PROVIDED WITH A THREE-PRONG GROUNDING PLUG. THIS PLUG MUST BE CONNECTED
INTO A PROPERLY GROUNDED THREE-PRONG RECEPTACLE. IF THE RECEPTACLE IS NOT
THE PROPER GROUNDING TYPE, CONTACT AN ELECTRICIAN. DO NOT REMOVE THE
GROUNDING PRONG FROM THIS PLUG.
Access the electrical connection point by removing panel(s) on the side where the controls are located.
Ensure that the electrical power supply agrees with the specifications on the oven's data plate and
complies with the wiring diagram on the oven.
Stacked Ovens or Oven and Warmer
1. Remove all side panels.
2. Attach power leads (furnished as part of the stacked set) to the line side of the terminal block of
upper oven.
3. Attach wire guide with wires already installed by means of (2) M5 nuts.
4. Carefully route wires through bushing in top oven and attach to terminal block of top oven.
5. At the same time attach power leads to lower oven or warmer terminal block as shown on the wiring
diagram and attach power supply conduit to the bottom of the lower oven or warmer.
6. Attach power supply leads to line side of terminal block.
7. Inspect and check all wiring and terminal connections for tightness and proper routing away from
any moving parts or pinch points.
8. Carefully replace the ovens' or oven and warmer's panels.
Single Oven or Warmer
1. At the same time attach power leads to oven or warmer terminal block as shown on the wiring
diagram and attach power supply conduit to the bottom of the oven or warmer.
2. Attach power supply leads to line side of the terminal block.
3. Inspect and check all wiring and terminal connections for tightness and proper routing away from
any moving parts or pinch points.
4. Carefully replace the oven's or warmer's panels.
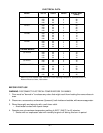
Refer to the Electrical Data chart on the next page.