


ELECTRIC COMBI OVENS - SERVICE PROCEDURES AND ADJUSTMENTS
Page 32 of 68
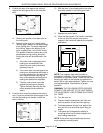
A. If the space is larger at the hinge end,
remove shim(s) from behind the hinges or
from in front of the door locking
mechanism.
B. If the space is smaller at the hinge end,
add shim(s) behind the hinges or in front
of the door locking mechanism.
NOTE
: If shims are removed from the top hinge,
also remove them from the top hinge.
17. If the space is equal, but the oven does not
seal. Remove shims from the hinges and in
front of the door locking mechanism.
18. Once the necessary adjustments have been
made and the door is closing properly, replace
the right side panel and turn the oven off.
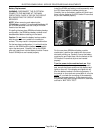
BUZZER ADJUSTMENT -
PROGRAMABLE CONTROL
To properly set the buzzer, both the frequency and
volume
must be adjusted to obtain the best audible
results. These adjustments are independent of each
other and require a configuration mode change and
a manual adjustment of the trim pot.
WARNING:
THE FOLLOWING STEPS REQUIRE
POWER TO BE APPLIED TO THE UNIT DURING
THE ADJUSTMENT. USE EXTREME CAUTION AT
ALL TIMES.
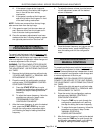
1. Remove the right side panel as outlined under
“COVERS AND PANELS” in “REMOVAL AND
REPLACEMENT OF PARTS”.
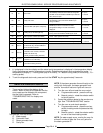
2. Place the control into configuration mode as
outlined under “PROGRAMABLE CONTROL -
CONFIGURATION MODE”.
A. Press the
START/STOP
key to cycle
through the configuration parameters until
reaching the step for setting the buzzer
frequency.
B. To adjust the buzzer frequency, follow the
procedure as outlined in step 6 under
“PROGRAMABLE CONTROL -
CONFIGURATION MODE”.
3. After the buzzer frequency is set to the desired
level, press the
START/STOP
key to cycle
through the configuration parameters again,
until reaching the step for setting the buzzer
frequency.
4. To adjust the buzzer volume, turn the buzzer
volume adjustment screw until the desired
volume is obtained.
5. Once the buzzer frequency and volume are set
to the desired levels, press the
OFF
key to
save the setting and exit the configuration
mode.
BUZZER ADJUSTMENT -
MANUAL CONTROLS
To properly set the buzzer, both the frequency and
volume
must be adjusted to obtain the best audible
results. These adjustments are independent of each
other and require a configuration mode change and
a manual adjustment of the trim pot.
WARNING:
THE FOLLOWING STEPS REQUIRE
POWER TO BE APPLIED TO THE UNIT DURING
THE ADJUSTMENT. USE EXTREME CAUTION AT
ALL TIMES.
1. Remove the right side panel as outlined under
“COVERS AND PANELS” in “REMOVAL AND
REPLACEMENT OF PARTS”.
2. Place the control into configuration mode as
outlined under “MANUAL CONTROLS -
CONFIGURATION MODE”.
A. Press the
TIME
key to cycle through the
configuration parameters until reaching
the step for setting the buzzer frequency.
B. To adjust the buzzer frequency, follow the
procedure as outlined in step 6 under
“MANUAL CONTROLS -
CONFIGURATION MODE”.
3. After the buzzer frequency is set to the desired
level, press the
TIME
key to cycle through the
configuration parameters again, until reaching
the step for setting the buzzer frequency.