


ELECTRIC COMBI OVENS - SERVICE PROCEDURES AND ADJUSTMENTS
Page 29 of 68
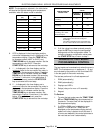
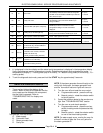
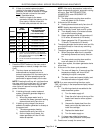
CODE RELAY COMPONENT TEST CONDITION
01 K1 door motor
Door magnetic reed switch. Result will be displayed
automatically. Rotate the door handle to change the
condition. Press and hold the TEMP key to close the
door; release to open.
0 = open;
1 = closed
02 K2 cavity vent motor
Cavity vent micro switch. Result will be displayed
automatically. Press and hold the TEMP key to
change condition.
0 = open;
1 = closed
03 K3, K6 contactor KM1 (half power, full speed)
Convection fan motor value - press and hold the
TEMP key for 30 sec. to test the fan motor
configuration settings. The test result will be
displayed .
0 = incorrect;
1 = correct.
04 K3 cooling fan(s) and door light only
Cavity Hi Limits and steam generator thermal
fuse(s). Press and hold the TEMP key for result.
0 = open;
1 = closed
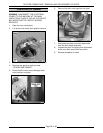
05 K3, K4 water injection solenoid (humidifier) Visual - water injection into cavity.
06 K5 drain pump Water level sensors (water level in steam generator)
0 = unsatisfied;
1 = satisfied
07 K3, K5 water fill solenoid Water level sensors (water level in steam generator)
08 K3, K7
contactor KM2 (half power, half speed);
on 20 levels only, contactor KM3 and
drain cool down solenoid.
09 K3, K8
contactor KM3 and drain cool down
solenoid on 6 & 10 levels; contactor
KM5 on 20 levels only.
(steam generator heating elements)
10 K3, K10
contactor KM7 (convection heating
elements on 10 & 20 levels)
11 K3, K9
contactor KM6
(convection heating elements)
5. t1 is displayed in the time display and the actual cavity temperature is displayed in the temperature display.
Verify the probes are sensing temperature correctly. Rotate the adjustment knob and select the probe
temperature to display (T1 = cavity probe (top on 20 levels); T2 = bottom cavity probe (20 levels only); T3 =
cooking probe).
6. To exit the diagnostic test mode, press and hold the
START
key for approximately 3 seconds.
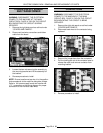
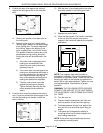
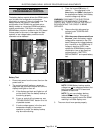
SERVICE ERROR LIGHTS
1. There are four lights at the bottom of the
control. When lit, they tell the operator that the
oven needs service related to the component
that the light(s) represent. Refer to
“TROUBLESHOOTING” for display error
codes.
The lights are, from left to right.
A. Water supply.
B. Convection heat.
C. Steam generator heat.
D. Cavity fan.
NOTE
: If the steam generator thermal fuse(s) or the
cavity high limits open, the steam generator heat
and the convection heat error lights will come on.
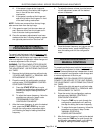
2. Turn the oven off and reset the oven control.
A. Programmable control - press the off key.
B. Manual controls - rotate the selector switch
to the off position.
3. Correct the problem related to the service error
light. See “TROUBLESHOOTING” section.
4. Turn the oven on and check operation.
A. Programmable control - press the on key,
select a heating mode and press start key
to begin.
B. Manual controls - rotate the selector switch
to one of the three heating modes.
NOTE
: On water supply errors, monitor the oven for
at least 5 minutes to pass the “time out” period for
the steam generator fill.