


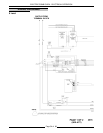
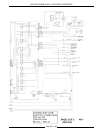

ELECTRIC COMBI OVEN - ELECTRICAL OPERATION
Page 49 of 68
A. Press the temp up or down keys to set the
Delta T differential.
3. Press probe key.
A. Press the time up or down keys to set the
final product temperature.
4. Press Start/Stop key to begin the cooking
cycle.
NOTE
: The Delta T differential can not be adjusted
without stopping and starting the cycle again. The
Delta T differential is retained in memory and is
displayed when the Delta T key is pressed.
NOTE
: The probe temperature can be adjusted
throughout the cooking cycle by pressing the up or
down time keys. The adjusted temperature is
retained in memory and is displayed when the time
key is pressed.
A. Start/Stop LED on.
5. Internal product temperature reaches probe set
point temperature.
A. Buzzer sounds for approximately 10
seconds on and 45 seconds off. The
buzzer continues to cycle at these times
until the Start/Stop key is pressed.
B. Probe temperature flashes in the time
display.
C. Convection and/or steam generator
heating elements de-energized.
D. Cavity fan motor(s) remain energized.
6. Press Start/Stop key to end the heating cycle.
A. Start/Stop LED off.
B. Buzzer off.
C. Delta T method remains selected with
Delta T and probe LED’s on.
D. Cavity fan motor(s) de-energized.
E. Probe and Delta T temperatures remain as
entered unless the heating mode or set
point temperatures are changed or the
oven is turned off.
NOTE
: If time key is pressed accidently, the
Delta T method is canceled and the LED turns
off.
Programed Cooking Operation
Refer to the Installation & Operation Manual for
programing instructions.
Powering Down
1. The control can be in any heating mode and
the door in the open or closed position.
2. Press the off key.
NOTE
: There is a four second time delay after
pressing the off key to cancel the shut down
sequence and resume normal operation.
A. Displays and LED’s turn off.
B. All power removed from the heating
elements and cavity fan(s).
C. Vent motor energized and operates till
vent opens.
D. Door unlocks and opens.
E. Drain pump activated for 45 seconds on 6
and 10 levels; 60 seconds on 20 levels.
3. At the end of the drain cycle.
A. Cavity lamp de-energized.
B. Cooling fan(s) de-energized.
Manual Oven Controls
This sequence of operation is written for the combi
oven models that use the deluxe manual or
standard manual oven controls. Control features
that are not
available on the standard manual
control, are indicated where the differences occur.
The three heating modes outlined below
(convection, steam and combi) are for manual
operation of the oven. The timed and temperature
probe cooking methods are then outlined.
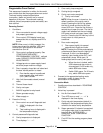
Powering Control
1. Conditions.
A. Oven connected to correct voltage supply
and properly grounded.
B. Oven control (CPU/display/keypad board)
are powered but not on; displays and
LED’s are off.
NOTE
: When oven is initially powered, the
buzzer sounds and the displays, LED’s and
service error lights come on for three seconds
then turn off.
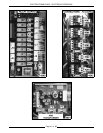
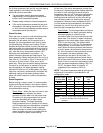
C. Oven control configured properly. See
“CONFIGURATION MODE - MANUAL
CONTROLS” outlined under “SERVICE
PROCEDURES AND ADJUSTMENTS”.
D. Voltage tap wire on power supply board
set to the proper machine voltage.
E. Door is properly closed but not locked and
the door handle position is closed.
1) Door handle magnet is positioned
over magnetic door reed switch
(N.O.) and is closed.
F. High limit thermostats closed (manual
reset).
G. Thermal fuses closed.