


FULL SIZE ELECTRIC CONVECTION OVEN - REMOVAL AND REPLACEMENT OF PARTS
F25105 (December 2001)Page 13 of 60
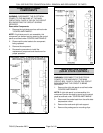
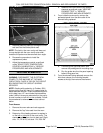
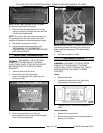
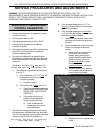
3. Remove the lower door seal strip to expose the
mounting screws of the door assembly.
4. Remove the two (2) lower sill bolts by the lower
door shaft and the four (4) counter-sunk screws
from the lower sill.
NOTE:
The door assembly is heavy and will drop
down once the last screw is removed. If removing
door assembly with-out assistance, use caution.
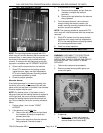
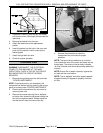
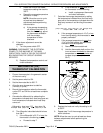
5. Tilt the top of the door slightly forward and lift
the door up until the bottom of the door shaft
clears the opening in the sill.
6. Lay the door flat to prevent damage.
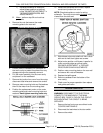
7. The top and bottom bearings are now
accessible for inspection and/or replacement if
needed.
A. If bearings are ok, proceed to step 8.
B. If replacing the top bearing, remove the
top bearing retainer and top bearing.
C. If replacing the bottom bearing, remove it
from the door shaft or the lower sill
opening.
8. Reverse procedure to install door assembly
and check for proper adjustment as outlined
under "DOOR ADJUSTMENT" and "DOOR
SWITCH ADJUSTMENT" in "SERVICE
PROCEDURES AND ADJUSTMENTS".
OVEN DOORS
(SIMULTANEOUS DOORS)
WARNING:
DISCONNECT THE ELECTRICAL
POWER TO THE MACHINE AT THE MAIN
CIRCUIT BOX. PLACE A TAG ON THE CIRCUIT
BOX INDICATING THE CIRCUIT IS BEING
SERVICED.
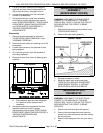
Assembly Removal
1. Remove the top front cover and bottom front
cover as outlined under "COVERS AND
PANELS".
2. Remove the door switch lever.
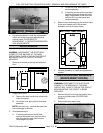
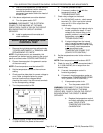
3. Remove the top bearing retainers and top
bearings.
4. Remove the lower door seal strip to expose the
mounting screws of the door assembly.
A. Remove the two (2) lower sill bolts by the
lower door shaft and the four (4)
counter-sunk screws from the lower sill.
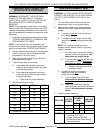
NOTE:
The door assembly is heavy and will drop
down once the last screw is removed. If removing
door assembly with-out assistance, use caution.