


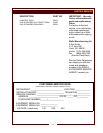

NOTE: DO NOT discard
the carton or other packing
materials until you have
inspected the appliance for
hidden damage and tested it
for proper operation.
Refer to SHIPPING DAMAGE
CLAIM PROCEDURE on the
inside front cover of this
manual.
WARNING:
PERSONAL
INJURY RISK
Installation procedures must
be performed by a qualified
technician with full knowledge
of all applicable electrical and
plumbing codes. Failure can
result in personal injury and
property damage.
WARNING:
ELECTRIC
SHOCK HAZARD
All servicing requiring
access to non-insulated electri-
cal components must be per-
formed by a factory authorized
technician.
DO NOT open any access
panel which requires the use
of tools. Failure to
follow this warning can
result in severe electrical
shock.
UNPACKING & INSPECTION
Carefully remove the appliance from the carton. Remove all
protective plastic film, packing materials and accessories from the
Appliance before connecting electrical power or otherwise performing
any installation procedure.
Carefully read all instructions in this manual and the Installation
Instruction Sheet packed with the appliance before starting any
installation.
Read and understand all labels and diagrams attached to the
appliance.
Carefully account for all components and accessories before
discarding packing materials. Store all accessories in a convenient
place for later use.
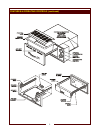
COMPONENTS
1 - 4 ea. DRAWERS (qty. depends on model)
1 - 4 ea. HUMITROL RACKS (if ordered with unit)
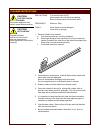
FABRICATION
Refer to INSTALLATION INSTRUCTIONS for cutout dimensions and
support fabrication information.
1. Layout front panel cutout dimensions. Cut hole in counter front
panel.
2. Position supplied mounting flange in hole to determine hole
location. Drill hole using #34 drill.
3. Attach flange to front panel using the provided #6 screws.
4. Fabricate rails and rear support as shown in instructions.
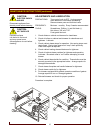
INSTALLATION
Refer to electrical specifications on page 1. Circuit must meet or
exceed the amperage and wattage requirements listed.
1. For ease of installation, remove drawer from unit.
2. Slide unit through front panel opening until rear of unit rests on the
rear support.
3. Remove TEMPERATURE CONTROL KNOB and CONTROL
PANEL.
4. Install provided #8-32 speednuts on mounting flange. Secure
mounting flange to the front panel and secure unit to mounting
flange using the provided #8-32 flathead screws.
5. Connect power leads (including ground lead). Wiring or conduit
must be secured to the warmer with a suitable strain relief
(provided by electrical installer).
6. Reinstall CONTROL PANEL and TEMPERATURE CONTROL
KNOB.
INSTALLATION
4