


USING YOUR 3 IN 1 COFFEE CENTER – PREPARING ESPRESSO
The glass espresso carafe has markings for 2 and 4 cups: A cup of espresso is
approximately 2 oz. and does not equal an 8 oz. measuring cup. Use the espresso
carafe markings for all of the following measurements.
• 2 cups of water = 2 cups of espresso
• 4 cups of water = 4 cups of espresso.
1. Place appliance on dry, level, heat-resistant surface, away from any edge.
2. With both switches in the “OFF” position, plug cord into a 120 volt AC electric
outlet only.
3. Place the espresso filter basket into the filter holder. Fill with desired amount of
ground espresso coffee. The filter basket is marked on the inside for 2 and 4
cups. Press the coffee lightly and clear any excess coffee from the rim of the
filter holder. This will assure proper fit to the brewing head. NOTE: Do not press
coffee too tightly or fill more coffee than indicated by the four-cup marking into
the filter basket. This may cause clogging or overflow.
4. Insert the filter holder into the appliance. To insert the filter holder, line up the
arrow located on the thumb guard of the filter holder with the arrow on the left
side of the machine. Flip thumb guard back and out of the way. Raise the filter
holder up into brewing head and turn the filter holder firmly to the right until it
can go no further. The arrow on the filter holder should be as far right in the
lock-range as possible. If the arrow is not at least in the middle of the lock-range
remove the filter holder and insert it again as described above until the arrow is
within the lock-range. Following this procedure will prevent the filter holder from
being dislodged as pressure builds up during the brewing process.
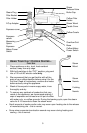
5. Open the hinged lid located on tgop back of coffee center and unscrew the
boiler cap located inside by turning counter clockwise.
Fill the boiler chamber with cold water using the markings indicated on the glass
espresso carafe. NOTE: Never pour water into the boiler chamber while the
appliance is on if the tank is hot. Never fill more than 10oz (300ml) of water into
the boiler chamber. It is very important to fill only the amount of water you need
into the boiler chamber. Your coffee machine will always need to
process all the water until the boiler chamber is empty.
7
6. Replace and secure the boiler cap by turning it clockwise.
7. Make sure the overflow grid and base are in place. Place espresso
carafe lid on espresso carafe so the lid opening points towards the
pouring spout of the carafe. Place espresso carafe under the filter
holder so the spout of the filter holder is positioned in opening of
carafe. Make sure the steam release valve is fully closed
(clockwise). NOTE: To make espresso directly into two cups, clip the two-cup
adapter onto the filter holder and make sure that the cups are placed directly
underneath the spouts.
8. Turn the ESPRESSO switch to “ON” position. It will take approximately 2
minutes for the water to be heated. The water will then be forced through the
ground coffee into the glass carafe or cups. Wail until all the water in the boiler
chamber has been used. Switch the ESPRESSO switch to the “OFF” position.
• Do not unscrew the boiler cap while the machine is in operation. Wait until
brewing cycle is completed and all water and steam has been used.
• Use caution when removing the filter holder, as the metal parts will still be hot.
To remove the filter holder, turn the filter to the left, past the “lock” marking until
the holder dislodges from the machine.
• Hold thumb guard down while disposing of grounds to keep filter in place.