


8
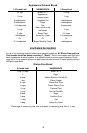
CREATING ARTISAN BREAD CRUSTS: Just before the bread baking cycle begins,
open the cover of the bread maker and carefully brush the top surface of the dough
with a lightly beaten egg white that has been mixed with 1 teaspoon of water. If
desired, slash the top of the dough ¼ to ½ inch deep with a sharp knife into desired
design. Leave plain or sprinkle with seeds, herbs, grated parmesan or romano
cheeses, or other desired toppings. Press toppings gently into the dough to ensure it
adheres and will not fall off. Close the cover and allow bread to bake.
For best results, use only the beaten egg white with water to treat the crust before
the bake cycle begins. This mixture will ensure that toppings will stick and not fall off
when bread is removed from the pan.
Do not use vegetable oil cooking sprays to treat crusts, as the cooking sprays can be
flammable when exposed to the bread maker’s heating unit.
Crust can also be treated after bread is done baking. Remove bread from the bread
pan and place on a rack. Lightly brush the top of the loaf with melted butter,
margarine, olive oil, or vegetable oil and sprinkle desired topping on to the bread’s
top.
B
ASIC
S
TEPS IN
M
AKING
B
READ
Always clean your new appliance thoroughly before using. Refer to “Cleaning
Your Automatic Breadmaker” section.
1. With the bread pan at a diagonal, insert the bread pan into the baking chamber.
Be sure that the bread pan is seated into the coupler at the bottom of the baking
chamber completely. Turn the bread pan clockwise to lock into position. To
remove the bread pan, turn the pan counter-clockwise and lift. CAUTION: The
handle is hot after baking. Use oven mitts or hot pads when removing a hot
bread pan.
2. Position the knead blade on to the shaft in the bottom of the bread pan,
matching the hub shape with the shaft shape. You may need to twist the bar
slightly for the knead blade to drop in place. Make sure the knead blade is
pushed down on the shaft all the way.
3. Add ingredients to the bread pan in the order listed in the recipe; liquids first,
then the butter or margarine, next the dry ingredients and finally the yeast. For
best results level the dry ingredients before adding the yeast.
4. Plug the breadmaker cord into a 120 volt, AC electrical outlet ONLY.
5. Use the “MENU” button to select the desired program menu.
6. Use the “LOAF” button to select the desired loaf size.
7. Use the “COLOR” button to select the desired crust darkness.
8. If desired, use the “TIME +” and “TIME -” buttons to set the elapsed time for
when the program is to be completed.
9. Press the “START/STOP” button to begin the program. After the breadmaker
has been turned on, the programmed setting cannot be changed without
canceling the program. To change the setting, hold the “START/STOP” button
down until the alert sounds; program the control as desired and turn back on.
10. When the bread is done, an alert will sound. Turn the breadmaker off by holding
the “START/STOP” button down until the alert sounds. Unplug the cord from the
electrical outlet. If the breadmaker is not turned off after the cycle is complete,
the breadmaker will automatically go into a one hour “Keep Warm” mode. If the
machine is not turned off after the end of the “Keep Warm” period, the machine
will turn itself off.
11. Remove the bread pan. CAUTION: The handle is hot after baking. Use oven
mitts or hot pads when removing a hot bread pan.