


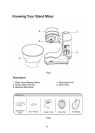


Operating Your Stand Mixer
General Operations
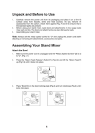
1. Place the stand mixer on suitable work surface. The surface should be sturdy,
flat, smooth and clean; make sure that there is no flour or oil on the surface and
away from faucets, sinks and heat sources. A clean smooth surface will provide
the best footing and will limit slipping and/or “walking”. The mixer is also
designed with suctions cups on the base for extra hold on the work surface to
prevent slippage and provide added security.
2. Make sure the “Rotary Speed Control”(2) is set to “O” and unplugged from
electrical outlet.
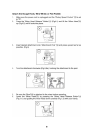
3. Press the “Mixer Head Release Button”(1) and lift “Mixer Head”(5) up by hand
until it locks into place.
4. Select attachment you wish to use and attach to the Attachment Post. (see
Assembling Your Mixer, section: To attach the dough hook, wire whisk or flat
beater)
5. Lock “Bowl”(3) onto the bowl locking plate. (see Assembling Your Mixer, section:
To attach the bowl)
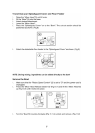
6. Lower the “Mixer Head” by pressing the “Mixer Head Release Button” and
guiding the “Mixer Head” down carefully with your hands. If the “Mixer Head” fails
to lock into place, check the “Bowl” to make sure that it is properly in place.
7. Place the “Splashguard Cover” on the “Bowl”. (see Assembling Your Mixer,
section: To fit and use your anti-splash cover) The cover has an integral feeding
funnel. The cover may be removed to add ingredients, but the cover should be in
place whenever the mixer is in operation. It is highly recommended to add
ingredients through the funnel. The “Splashguard Cover” serves to prevent the
escape of flour dust at the beginning of the stirring and kneading process, and
also serves to prevent accidental contact with the moving “Dough Hook”.
8. Plug the mixer into an electrical outlet nearby.
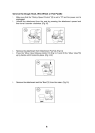
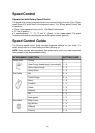
9. Turn the “Rotary Speed Control” to desired speed setting. The mixer will start
gradually, to avoid spattering, and build up to the selected speed.
10. To change the speed during operation, simply turn the “Speed Control” to the
desired setting.
11. To turn mixer off, turn the “Rotary Speed Control” to “O”. The unit will keep
turning for approximate 3 cycles to its park position before the mixer head
completely stops. This is the normal operation and allows you to slowly lift the
beater from the mixer. This special operational design provides for a smooth
stop to the rotary action and extends the life of the appliance. Unplug the
appliance from the electrical outlet.
12. To remove attachment (Dough Hook, Wire Whip or Flat Paddle), press them up
as far as possible, then turn clockwise to release. Pull from the attachment post.
Warning:
To avoid risk of injury, be sure to switch off the stand mixer before scraping the sides
of the Bowl. The Bowl is designed to mix effectively and require minimal scraping.
Never attempt to scrape the sides of the Bowl while the mixer is operating.