


Numbers
correspond
to steps.
14. 15. 16. 17.
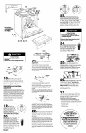
Product Damage
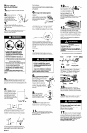
Carefully place burner cap over
electrode.
Failure to do so may damage electrode.
I 1
1
_ burner
cap
18
n
Place the burner cap over
locating tabs on burner base. Burner cap
should be level when properly positioned
Place burner grates over burner and caps.
Electronic Ignition System -
Initial lighting and gas flame
adjustments
Cooktop and oven burners use electronic
ignitors in place of standing pilots. When the
cooktop control knob is turned to the “LITE”
position, the system creates a spark to light
the burner. This sparking continues until the
control knob is turned to the desired setting.
When the oven control is turned to the
desired setting, a glow bar heats up bright
orange and ignites the gas. No sparking
occurs and the glow bar remains on while
the burners operate.
19
n
Check the
operation of the cooktop
burners. Push in and turn
each control knob to “LITE”
position. The flame should
light within 4 seconds.
Do Not leave the knob in the
“LITE” position after burner lights.
20
n
After burner liahts. turn
control knob to “HI” positTon..
Check each cooktop burner for
proper flame. The small inner
cone should have a very distinct
blue flame l/4” to l/2” long. The
outer cone is not as distinct as the
inner cone. If the flame is noisy or
blowing, it is getting too much air.
If the flame is too soft and lazy, it is
not getting enough air.
Panel D
burner
base
L
21
\\
n
If burners need adjusting for
proper flame:
a.
Pull range forward, away from the wall, to
make access to back burners easier.
b.
Remove burner grates and burner caps.
Remove screw that holds burner base to
maintop. Pull burner base straight upward to
remove from air mixer (brass fitting). Repeat
for each burner.
retaining
w
c. Disconnect spark ignition wires from
electrode assembly.
Remove screw that holds air mixer to the
underside of maintop. Repeat for each
burner.
d.
Lift front of maintop enough to clear front
of range. Grasp both sides of maintop and
lift while pulling forward to remove maintop
from range.
tter
e. Adjust air shutter for each burner as
required. Close the air shutter to decrease
the amount of air to the flame. Open the air
shutter to increase the amount of air to the
flame. Retest burners after replacing top as
described in Step 22.
22
n
fit studs on back of maintop into
holes in rear brackets. Feed the ignition
wiring up through the maintop. Reconnect
ignition wiring for each burner at the
electrode.
Carefully lower maintop into place and
avoid hitting the control panel. Reinstall air
mixer screws, burner bases and burner base
screws. Locate the tab on the burner caps
and place over the white electrodes in the
burner bases. See Step 18.
Reinstall burner grates. Slide range back into
final position, checking that rear leveling
leg(s) are engaged in anti-tip bracket(s). See
Step 12.
23
n
Check the oven burner for
proper flame. Open the oven door and
remove the lower oven rack and oven
bottom. Push in and turn oven selector knob
to “BAKE”. Push in and turn oven control
knob to 300°F.
The oven burner should light
in
50-60
seconds.
This delay is normal. The
oven safety valve requires a certain time
before it will open and allow gas to flow.
Product Damage
l
Do Not insert any object into the
openings of the protective shield that
surrounds the ignitor.
l
Do not clean the area.
Failure to follow these instructions could
result in product damage.
24
n
Check the oven burner
for proper flame. This flame should
be l/2” long, with inner cone of
bluish-green, and outer mantle of
dark blue, and should be clean
and soft in character. No yellow
tips, blowing or lifting of flame
should occur.
25
w If oven flame needs to be
adjusted, locate the air shutter next to the
pressure regulator. Loosen screw and adjust
the air shutter until the proper flame
appears. Tighten screw. Replace storage
drawer, oven bottom and oven racks.
L-UU -
Y
IT
26
n
Check the operation of the oven
broil burner. Push in and turn the oven
control knob to “BROIL”.
The oven broil
burner should light in 50 to 60 seconds. This
delay is normal.
The oven safety valve
requires a certain time before it will open
and allow gas to flow.
27
n
The flame should be l/2” long
with inner cone of bluish-green and outer
mantle of dark blue. The flame also should
be clean and soft in character with no
blowing or lifting of flame.
If the flame needs to be adjusted:
1.
Remove the two screws fastening the
front of broil burner to the oven. Pull the
broil burner forward. Loosen the lock screw
on the air shutter located at the rear of
the broil burner.
2. Adjust the air shutter as needed. Tighten
the lock screw.
/ Congritulations! \
Use & Care Guide. Keep installation
Instructions and Guide close to