


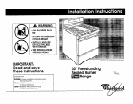


L.P. gas conversion
Natural gas
Converting to L.P. gas should be
done by a qualified installer.
conversion
The ignitor must remain in its shield when
1 removing ba~~~~p.““’
Failure to do so could break ignitor.
Converting to Natural gas should be
done by a qualified installer.
Fire Hazard
. Locate gas supply valve between
pressure regulator and gas valve. Shut
off gas supply valve to range before
converting to L.P. gas.
l
Make all cooktop, oven and broil burner
conversions before turning gas supply
valve back on.
Failure to follow these instructions could
result in fire, explosion or other personal
iniurv.
Fire Hazard
. Locate gas supply valve between
pressure regulator and gas valve. Shut
off gas supply valve to range before
converting to Natural gas.
l
Make all cooktop, oven and broil burner
conversions before turning gas supply
valve back on.
Failure to follow these instructions could
result in fire, explosion or other personal
injury.
E
n
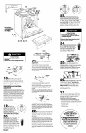
Broil burner:
1.
Remove the two screws fastening the front
of broil burner to oven.
Carefully pull burner downward to remove
Be careful to not break the ignitor coil. Set
burner aside.
2. Tighten orifice hood down snug onto pin
(approximately 2 to 2-l /2 turns).
DO NOT OVERTIGHTEN.
3. Carefully replace burner, sliding the ignitor
wires bock into original position.
A
n
Comblete installation Stebs l-1 4.
A
H Remove oven door, oven racks and
before converting your range to’L.P. gas.
Remove oven door, storage drawer, oven
rocks and oven bottom. Shut off gas supply
valve to range. Remove burner grates,
burner cops, and burner bases. See Panel D,
Step 21.
oven bottom. Shut off gas supply valve to
range. Remove burner grates, burner cops,
and burner bases. See Panel D, Step 21.
B
W Pressure regulator:
The pressure regulator on your range may
be one of two different types. Check Figures
4 and 5 to determine which pressure
regulator you have to convert. Follow the
instructions that apply to only that pressure
regulator.
L.P.
Natural
B
W Pressure regulator:
F
W After the burners hove been
converted to L.P. gas usage, complete Steps
15-l 8 and Step 22, Panels C & D.
Adjusting for proper flame
The pressure regulator on your range may
be one of two different types. Check Figures
2 and 3 to determine which pressure
regulator you hove to convert. Follow the
instructions that apply to only that pressure
regulator.
Natural L.P.
Product Damage
l
Electric ignitors are used to light the oven
and broil burners. Do Not insert any
object into the openings of the shield
surrounding the ignitor coil.
. Do Not clean this area.
Failure to follow these instructions could
result in product damage.
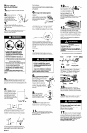
w
cap
washer +
Nat. gas
Figure 2
L.P. gas
1.
Remove the cop marked ‘NAT,” and turn
it over so it reads “LP.” Then replace the
cap. Do Not disturb or remove the spring
beneath the cap. Check that the fiber
washer is between the cop and the body of
the regulator. See Figure 2 for the correct
position on cap.
Nat. gas
Figure 4
L.P. gas
1.
Remove the cop marked ‘L.P.” and turn it
over so it reads “NAT.” Then replace the
cap. Do Not disturb or remove the spring
beneath the cap. Check that the fiber
washer is between the cop and the body of
the regulator. See Figure 4.
screwdriver slot
&cap4
A.
Cooktop burners:
Adjust the air shutters for proper flame by
sliding the air shutter to close or open the
shutter as needed. See Panel D, Steps 19-22.
L.P. gas has a slightly yellow tip on top of
burner flames in addition to the other proper
characteristics.
m- insert
Nat. gas
Figure 5
L.P.gas
2. Use a screwdriver to unscrew the cap.
Remove the insert marked “L.P.” from the
cop (insert fits very tightly). Reverse the insert
and push it firmly bock into the cop for as it
will go, The marking “NAT” should appear on
the insert Do Not disturb the spring in the
body of regulator.
Replace cop in body of the regulator and
tighten. See Figure 5.
screwdriver slot
Nat. gas
Figure 3
L.P.gas
2. Use a screwdriver to unscrew the cap.
Remove the insert marked ‘NAT” from the
cop (insert fits very tightly). Reverse the inset-l
and push it firmly bock into the cop for as it
will go. The marking “LP.” should appear on
the insert Do Not disturb the spring in the
body of regulator.
Replace cop and tighten. See Figure 3.
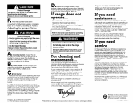
Natural gas
B
n
Oven burner:
Loosen screw and
adjust the air shutter as needed. The flame
should be l/2” long, with inner cone of
bluish-green, and outer mantle of dark blue.
The flame also should be clean and soft in
character with no blowing or lifting of flame.
Tighten screw. See Panel D, Steps 23-25.
increase gas ’
increase flame size
(Pre-set at factory for
Natural gas)
A
L.P. gas
decreass
decrease
gas
flame
size
L.P. gas
decrease
decrease
Natural gas
C
w Cooktop
burners:
Loosen the orifice
hoods away from pins 2 to
2-l /2 turns. The burner
flame connot be properly
increase gas -----
increase flame size
(Pre-set at factory for
Natural gas)
A
gas
flame size
u 4 Broil burner:
1.
Remove the two screws fastening the
front of broil burner to oven. Pull the broil
burner forward. Loosen the lock screw on
the air shutter located at the rear of the broil
burner.
2. Adust air shutter as needed. The flame
should be l/2” long with inner cone of bluish-
green and outer mantle of dark blue. The
flame also should be clean and soft in
character with no blowing or lifting of flame.
Tighten the lock screw. See Panel D, Steps
26-27.
C
c
w Cooktop
burners:
Turn the orifice
e *
hoods down snug onto pins .
(approximately 2 to 2-l /2
f
**. II_
+
turns).
DO NOT OVERTIGHTEN.
The
;/& , ,,
adjusted if this conversion is not made.
D
&
w Oven burner:
Loosen the
i R - -
-
orifice hood away from
2 to 2-l /2 turns, The
burner flame cannot
- _
be properly adiusted if t%
burner flames connot be properly adjusted if
this conversion is not made.
conversion’is not made.
E
w Broil burner:
1.
Remove the two screws fastening the front of
broil burner to oven. Carefully pull burner
downward to remove. Be careful to not break
the ignitor coil. Set burner aside.
2. Loosen orifice hood away from pin 2 to 2-l /2
turns,
3. Carefully replace burner, sliding the ignitor
wires bock into original position.
D
w Oven burner:
Turn the
orifice hood down snu
onto pin
(approximately
2 to 2- l/2 turns.)
DO NOT OVERTIGHTEN.
The burner flame
cannot be properly adjusted if this
conversion is not made.
D
n
Replace storage drawer, oven
bottom, and oven rocks. Reinstall maintop
and burner grates, burner cops and burner
bases. See Panel D, Step 22.
Panel E