screvl loCalions
7.
To mount onll-lip
bracket lo
wood rbor or wall. drill l/8’
hde~ 0t the two mounnng
sc,ew bcatlorls where me
two lines ore craned by the
third line.
To mod onff-lip brockel lo
concrete or ceramk float or
wall, use o mosoru-y drill
bit to drill l/4’ holes at each
mounting screw locatIon..
Tap plostlc anchors Into
mounthg holes In floor
or won.
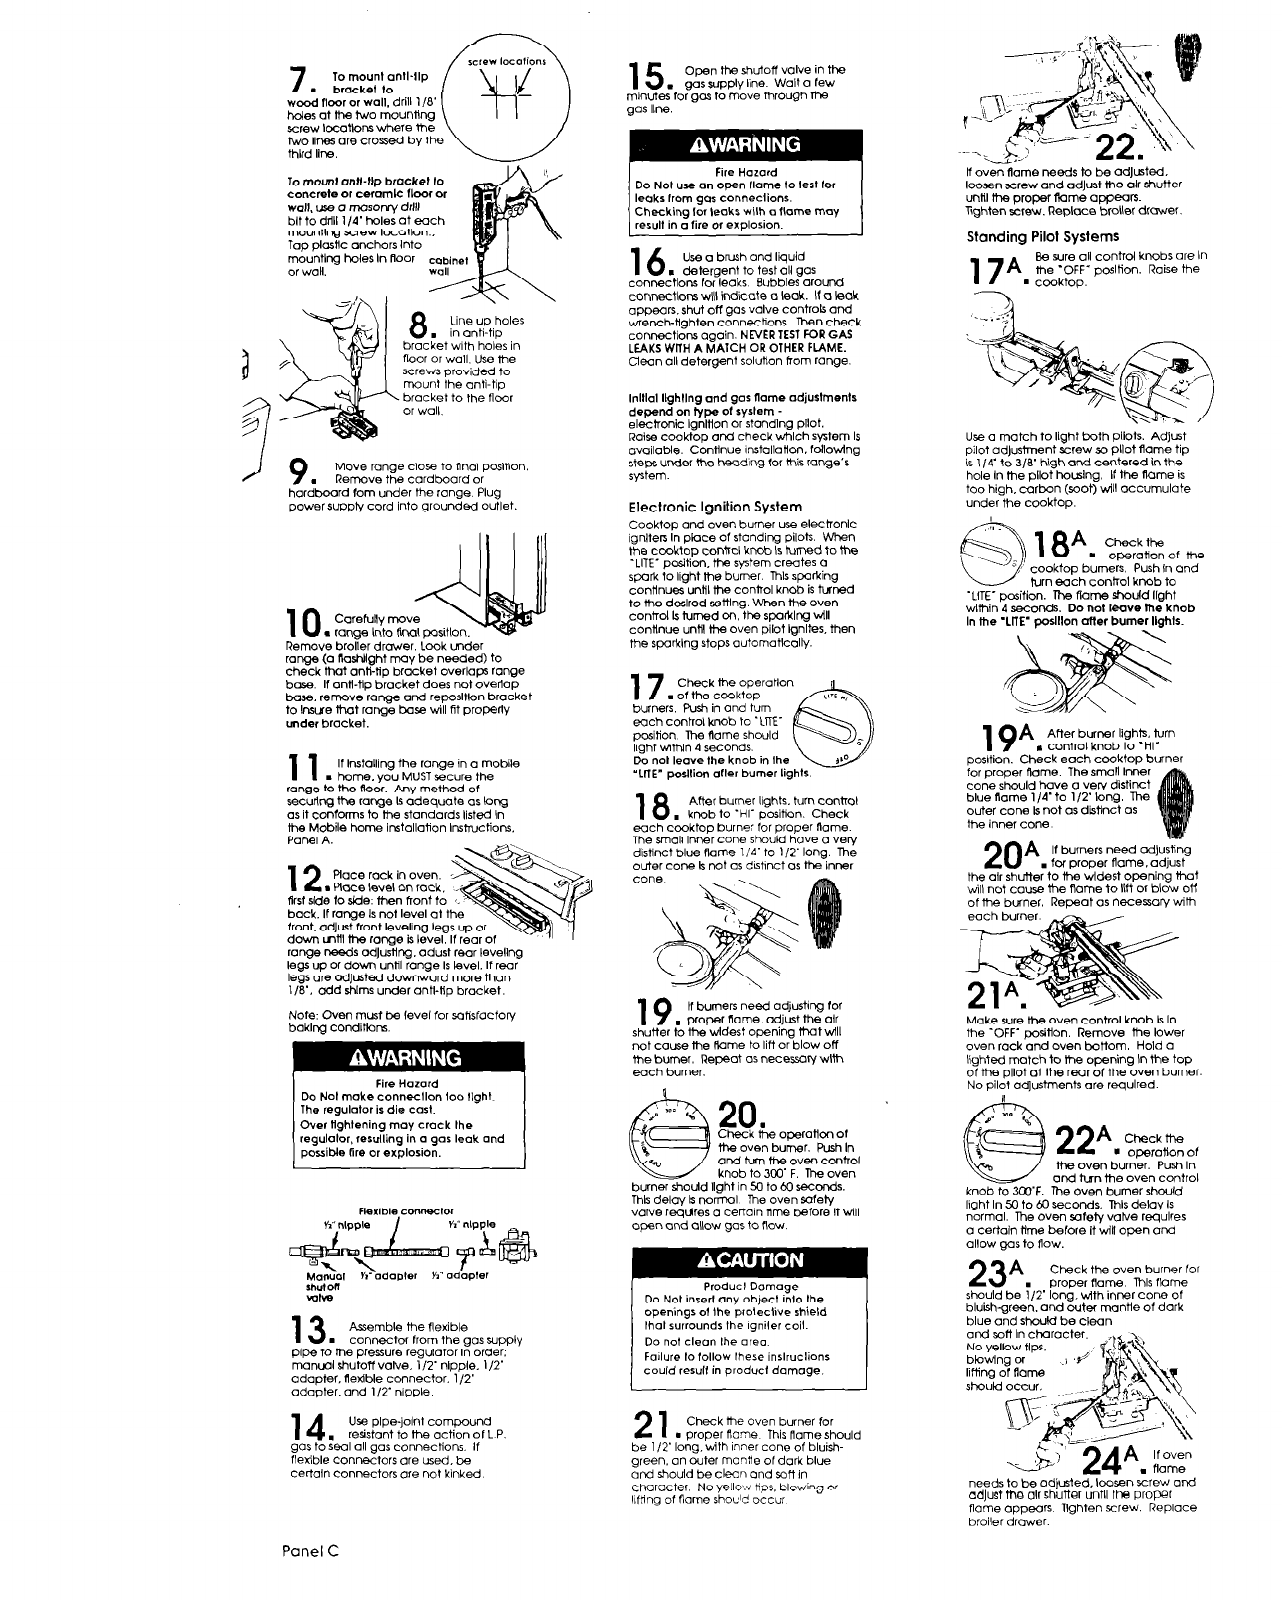
15
open tha shutoff valve in the
gas apply line. Wait 0 few
minuie;lor gas to move through tiw
gas Ilne
16
Use o brush and liquid
. detergent to test all gas
connections for leaks Bubbles around
connections will indicate o leak. If o leak
oppeors. shut oft gos valve controls and
wrench-tighten connechonr. hen check
connections again. NEVER TEST FOR GAS
LEAKS WfTH A MAICH OR OTHER FLAME.
Clean all detergent soluhon from range.
loosen screw and adJust the &r shutter
until the proper time appears
TiQhten screw. Replace broiler drawer.
Standing Pilot Systems
17A
Be sure all control knobs ore In
me ‘OFF. posItion. Raise the
n
ccoktop.
--x
bracket with holes in
n00r 0, ~011. Use me
screws provided to
mount the anti-tip
bracket to the floor
or wall.
lnlllal llghllng and gas flame odjuslmenls
depend on type of syslem -
electronic Ignition or stondlng pIlot.
Rake cooktoo and check wtlch svstem Is
available. Cbntinue wtollaHon. fdllowing
stem under the heodlng for this range’s
system.
Use o match to light both pilots. Adjust
pilot od)ustment screw so @lot flame tip
is l/4’ to 3/B’ high and centered in the
hole In the pllot hou%lng. If the fiome is
too high, curbon (soot) will oCCumulote
under me cooktop.
Move range close to flnol position
Remove the cardboard or
hardboord tom under the range. Plug
power supply cord into grounded outlet.
Electronic Ignition System
Cooktop and oven burner use elechonlc
igniters In place of standing pilots. When
the cooktop control knob Is timed to the
‘LITE’ position, the system creates Q
spark to light me burner. Thls sparking
continues until the control knob is twned
to the desired setttng. When the Oven
contrd Is fumed on. the spahlng till
continue until H-6 oven pilot Ignites. men
the SparkIng stops outOmotlColt$
1 7
Check
me
OperonOn
. of the cOOktop
llTl *,
burners. Push in and turn
eOch conhol knob to ‘ITIE-
position The flame should
light wittin 4 seconds.
‘6
Do not leave the knob in Ihe
c3
P
‘LITE” podlion after burner lights.
18
After burner lights. turn control
. knob to ‘HI- position. Check
each cooktop burner for proper flame.
The small inner cone should hove o vew
distinct blue flame 114’ t0 112’ long. The
outer cone Is not 0s dtstrnct 0s the inner
"'-
f3
1 8Am ~~~~~or me
‘,! cooktop burners. Push In and
turn arch control knob to
‘LITE- position. The fTame should light
wlmin 4 second?.. Do not leave the knob
In the ‘LITE’ poslllon otter burner Ilghls.
Remove broiler drawer. Look mder
range (a Ilashllght may be needed) to
check ttmt anti-tip bracket overlops range
base If ontl-tip bracket does not oveflop
hose. rerr-ove range one reposltlon bracket
to tmue that range txxe till fit properly
under bracket.
19A
After burner lights. turn
. control knob to ‘HI’
position. Check each cooktop burner
for proper Rome. The small Inner
cone should have o very distinct
blue name 114. to l/2’ long. me
outer cone Is not 0s dbtlnct OS
the inner cone
20A
If burners need cd)usting
. toi proper flame. adjust
the olr shutter t0 the widest Opening that
will not cause the name to lltt or blow otf
of me bwner. Repeat OS necenorv tim
1 1 m home.~ouMUSTsecure
the
If lnstollrng the range in o mobile
ran@3 to me Root. Any method of
securing the range Is adequate os long
(1s it conforms to lhe standards listed In
the Mobile home Instollofion Irrst~ctions.
Panel A
12
Place rock in oven.
m Race level on rock.
first side to side. then front to
back. If range Is not level at t
front. adJut front leveling leg
down vltll the rome k level,
range reeds odJu&g. odust rear leveling
legs up or down until range Is level. If rear
legs ore od]urted downward more than
118’. odd shlrm under ant+fip bracket.
Note: Oven must be level for xlfisfactory
boklng conditkx6
19
If burners need adjustrng for
. proper name. adjust me air
shutter to the widest opening ttwt will
not come me Aame to lift or blow off
me burner. Repeat 0s necessorJ
with
each burner.
Make sure the Oven control knob k In
the ‘OFF’ position. Remove the lower
oven rack and oven bottom. Hold Q
lighted match to the opening In the top
0f me pilot ot me rear 0f the oven burner.
No pilol od]ustments ore required.
Fire Hazard
Do Nol make connecllon loo Ilght
The regulator is die cost.
Over tightening moy crock Ihe
regulalor. resulling in (1 gas leak q nd
possiMe fire or explosion.
ti oven burner. Push In
and ha-n the oven contfol
knob to 3M)’ F. The oven
burner should lght in 50 to &I seconds.
Thk delay k norm0 The oven safety
valve reqtires 0 certo1n time before It till
open and Qllow QOS to flow.
N
knob to 3CO’F.
liclht In 50 to 60
22A
Check the
n operation of
the oven burner. Push In
or-c hsn me oven control
The oven burner should
~e~0i-d~. mk de10~ IS
n%mol. me oven safety valve rtiulres
a certain ltme before it will open and
allow gas to flow.
23A
Check the oven burner for
proper name. mls flame
should be 712’ long. ‘.+ith inner cone of
bluishgreen. and outer mantle of dark
blue and should be clean
lifting of Rome
should occur.
needs to be adjusted, looen xlrew and
adlust me air shuner unnl me proper
flame appwrs Tlghten screw. Replace
broiler drawer.
Producl Damage
Do Not insert any object inlo Ihe
openings 01 lhe proleclive shield
lhol surrounds the rgniler coil.
Do no, clean Ihe oreo
Fo~lure lo follow these inslruclions
could result in producl damage.
13
Assemble the flexible
. connector from the gos supply
pipe to the pressure regulator In order.
manual shutotf valve. l/2’ nlpple. 112’
adapter, flexible connector. 1’/2’
adapter. and l/2’ nipple.
21
Check the oven burner for
. proper Aome This name should
be l/2’ long. with rnner cone of bluish
green. an outer mantie of dark blue
and should be clew and soft in
cnaroctor, No yellw imps. blowing or
lifting of flame shocld OCCUR
1
4.
U5-y pipe-joint com,pwnU
resstont to me actron oft P
gas 63 sBoI all gas connections. If
flexible connectors are used. be
certain connectors ore not kinked
Panel
C


