


EN14
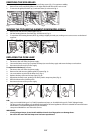
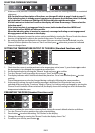
2. Press button to select the setting: the end of cooking time flashes.
3. To delay the end of cooking time, turn the “Browse” knob to set the desired value.
4. Confirm the selected value by pressing button .
5. Turn the “Browse” knob to position the cursor at START and then press .
6. The display indicates which shelf food should be placed on. Do as instructed and press to start
cooking. The oven will start cooking after a period of time calculated so as to finish cooking at the set
time (for example, in the case of a dish which requires a cooking time of 20 minutes, if the end of
cooking time is set to 20:10, the oven will begin cooking at 19:50).
N.B.:During the interval before cooking starts, the oven can in any case be switched on by turning
the “Browse” knob to position the cursor at “Start” and then pressing .
At any time, set values (temperature, grill setting, cooking time) can be changed as described in
previous paragraphs.
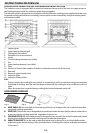
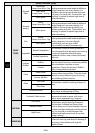
TIMER
This function can be used only with the oven switched off and is useful, for example, for monitoring the
cooking time of pasta. The maximum time which can be set is 1 hour 30 minutes.
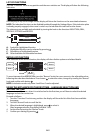
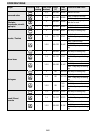
1. With the oven switched off, press button : the display will show “00:00:00”.
2. Turn the “Browse” knob to select the desired time.
3. Press button to start the countdown. When the set time has elapsed, the display will show
“00:00:00” and an acoustic signal will sound. At this point the time can be prolonged, proceeding as
described above, or the timer can be deactivated by pressing button (the time of day will be shown
on the display).
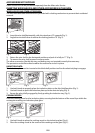
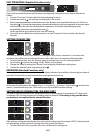
RECIPES
Thanks to “Sixth sense” technology, the oven offers 30 pre-set recipes with ideal cooking temperatures.
Simply follow the recipe as regards ingredients and the method of preparation. Then, proceed as follows:
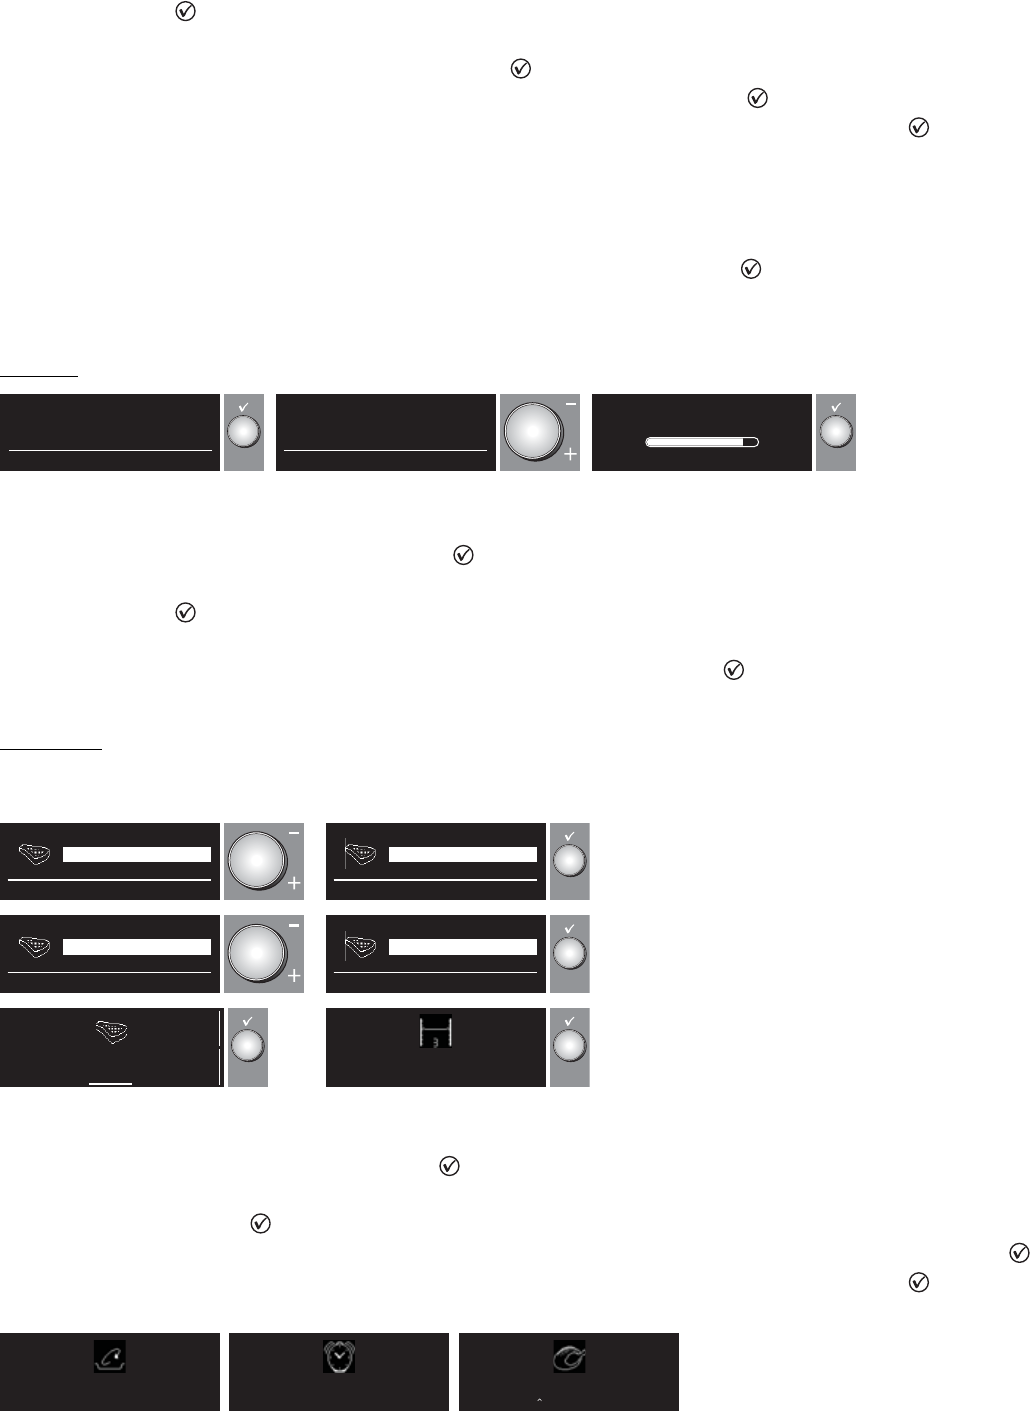
1. Select “RECIPES” by turning the “Functions” knob.
2. Select the dish to be cooked from the proposed list.
3. Confirm the selected dish using button .
4. Select the desired recipe by turning the “Browse” knob.
5. Confirm by pressing : the display shows the approximate cooking time.
6. Place the dish in the oven and turn the “Browse” knob to position the cursor at “Start”, then press .
7. The display indicates which shelf food should be placed on. Do as instructed and press to start
cooking. To delay the start of cooking, see the relevant paragraph.
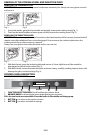
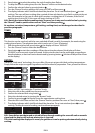
N.B.:Some dishes must be turned or stirred half way through cooking: the oven will emit an acoustic
signal and the display will indicate what action is required.
The initial cooking time displayed is merely for guidance: it can be prolonged automatically during
cooking.
Turn +/- to set Timer, ✓ to Start
00 : 00 : 00
(HH) (MM) (SS)
Turn +/- to set Timer, ✓ to Start
00 : 30 : 00
(HH) (MM) (SS)
Timer
01 : 09 : 00
CONTROL
Automatic
COOK TIME
END TIME
Pork Chops
19:20
- 00:32
Start
Insert food on level 3
Press
✓ when done
6th Sense: Press ✓ to view recipes
Fish
Dessert
Meat
6th Sense: Press ✓ to view recipes
Fish
Dessert
Meat
6th Sense: See cookbook for description
Shank of Pork
Kebabs
Pork Chops
6th Sense: See cookbook for description
Shank of Pork
Kebabs
Pork Chops
Please turn food
Cooking nearly nished
Please check on food
Cooking Finished at 19:45
Press to Prolong Cooking