1
SECTION ONE
INSTALLATION CONSIDERATIONS
GENERAL CONSIDERATIONS
For complete installation procedures see the “Installation Instructions” in the
literature packet provided with the dishwasher.
A video presentation, Key Features and Installation Considerations, part number
4317280V, is available. This video covers the entire installation process.
Each location will present a different set of challenges that can be anticipated and solved before instal-
lation begins.
• Check the planned location of the dishwasher.
• Easy access to hot water, drain line and electricity.
• Convenient access for loading. The dishwasher door should open and close freely.
• The opening under the counter should be square and the cabinet fronts should be perpendicu-
lar to the floor.
• Make sure the cabinet opening is free of intrusions such as braces or utility lines.
• Do not install the dishwasher on carpeted floors.
• An outside wall behind the dishwasher should be insulated to prevent the water line, inlet valve
and drain line from rupturing.
The application of a horizontal pump and filter
technology allows for the tub to be designed three
inches deeper than current models. This deeper
tub and longer door design will impact the instal-
lation process because there is less working
space available underneath the unit and correct
routing and placement of the drain hose, water
supply and electrical wiring is critical.
The tub must be level. Reduced water consump-
tion of this dishwasher requires that it be installed
level and plumb for proper water recirculation back
into the sump area during operation.
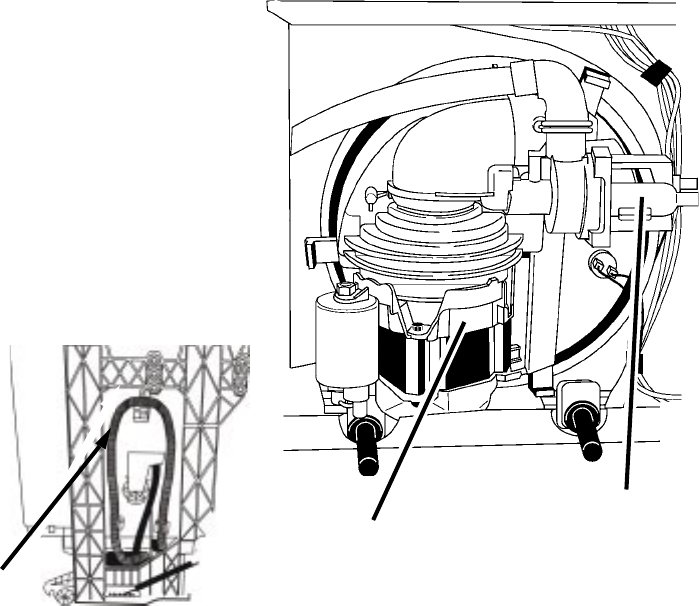
Do not remove the drain
hose from the left side of
the tub. This loop in the
drain hose provides pro-
per back pressure for the
soil sensor. If the loop is
removed, the dishwasher
will not initiate Automatic
Purge Filtration.
View of Sump Assembly from Underneath
Showing Horizontal Wash Pump Motor
and Drain Pump Motor
Drain Hose
Loop
Main Wash Motor
Drain Pump
Motor


