


Self-Cleaning Oven
l
Do not clean the door gasket.
The door gasket is essential for a
good seal. Be careful not to rub,
damage or move it.
l
Do not use oven cleaners. No
commercial oven cleaner or oven
liner protective coating of any
kind should be used in or around
any part of the oven.
l
Remove the broiler pan and
other cookware
before self-
cleaning the oven.
Cleaning Your
Cooking Center
l
Clean only parts listed in this
Use and Care Book.
l
Keep cooking center clean
and free of accumulations of
grease or spillovers which may
ignite.
If You Need Service
l
Read “The Problem Solver”
on page 23 of this book.
l
Don’t attempt to repair
or replace any part of your
cooking center unless it is
specifically recommended in
this book.
All other servicing
should be referred to a qualified
technician.
Installing the
Cooking Center
Your cooking center, like so many
other household items, is heavy and
can settle into soft floor coverings
such as cushioned vinyl or carpeting.
When moving the cooking center
on this type of flooring, use care.
Do
not install
the cooking center
over kitchen carpeting unless you
place an insulating pad or sheet of
l/4-inch-thick plywood between
the cooking center and carpeting.
When the floor covering ends at
the front of the cooking center, the
area that the cooking center will
rest on should be built up with
plywood or similar material to the
same level or higher than the floor
covering. This will allow the
cooking center to be moved for
cleaning or servicing.
Leveling the
Cooking Center
Your cooking center must be level
in order to produce proper cooking
and baking results. After it is in its
final location, place a level
horizontally on an oven shelf and
check the levelness front to back
and side to side.
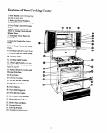
Leveling legs are located on each
corner of the base of the cooking
center. Remove the bottom drawer
and you can level the cooking
center on an uneven floor.
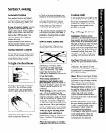
To remove drawer, pull drawer
out all the way, tilt up the front
and take it out. To replace drawer,
insert glides at back of drawer
beyond stop on cooking center
glides. Lift drawer if necessary to
insert easily. Let front of drawer
down, then push in to close.
Both of the rear leveling legs will
engage the ANTI-TIP bracket (allow
for some side to side adjustment).
Allow a minimum clearance of l/8”
between the cooking center and the
leveling legs to permit installation
into the ANTI-TIP bracket.
SAVE THESE
INSTRUCTIONS
5