Start Up
Electrical Shock Hazard
Special care must be taken when drilling into
walls. Electrical wires may be concealed behind
the wall covering:
- Use only an electric drill with a 3-wire power
supply cord connected to a grounded
receptacle.
l
Check with qualified electrician if you are in
doubt as to whether your electric drill is
properly grounded.
Failure to follow these instructions could result
in personal injury or death.
3a
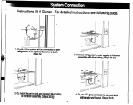
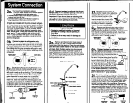
Mount filtration assembly:
. Solid Construction Cabinet: Position the
filtration assembly on either the right or left cabinet
wall and allow a minimum of 2” clearance above
the cabinet floor. Mark the location of the filtration
system’s bracket holes, then set the filtration assem-
bly aside and skip ahead to step 3b.
Non-solid Construction Cabinet: Replace filtration
assembly’s cover. Position the filtration assembly on
the cabinet floor along either the right or left cabinet
wall. Skip ahead to step 3c.
Basement Installation: Position the filtration
assembly on wood floor supports or on basement
wall. Mark the location of the filtration assembly’s
bracket holes, then set the filtration assembly aside.
Additional tubing may be required and is available
from your local plumbing distributor or from your
Whirlpool dealer. Continue with step 3b.
3b
Drill pilot holes for the mounting bracket at
. the locations you’ve marked. Insert mountin!
bracket screws in holes and tighten, leaving a slight
gap between screw head and wall.
For basement installation and solid construction
cabinet installation, place filtration assembly mount-
ing bracket on mounting screws and tighten screws
until filtration assembly is secure and replace cover.
3c
Make sure all tubing connected to grey
. push-in connectors is tight (pushed in as
far as it will go) and that tubing does not bind or kink
anywhere. Also make sure tubing does not interfere
with cabinet storage areas. Tubing may be cut to a
shorter length if necessary. Tubing may be secured I
cabinet walls with insulated staples as long as staple
do not crush or puncture tubing.
3d
Place a towel or bucket under saddle valve,
. then turn on cold water supply and saddle
valve and check for leaks.
3e
If filtration assembly was connected to refrig-
. erator, let ice maker produce two batches of
ice and discard both batches. This will flush the line
of any accumulated particles. If the refrigerator has a
water dispenser, flush the line by dispensing 2-3
gallons of water.
3f
If optional sink faucet was installed, lift faucet
. handle and dispense and discard the first
2-3 gallons of water. To get filtered water hold the
faucet handle down for momentary flow, or hold the
faucet up for continuous flow. To stop water flow
from the faucet, return the faucet to the center or
horizontal position.
General Information
n
Due to shipping, some carbon grains may appear in the first few gallons of water through your filtration
system. Simply flush the system until water becomes clear.
l
This
system can be connected to two dispensing points (including the optional sink faucet). We do not
recommend installing this water filtration system to your existing tap faucet as the flow rate will be
reduced to .6 gallons per minute.
l
Remember to cut all tubing to the shortest possible length to maximize your flow rate.
l
Maintenance of this water filtration system is very important.
Replace the Sediment (S), Lead Reduction (L), and Carbon Filter (CF) cartridges annually. Failure to
maintain this water filtration system over an extended period of time could present health risks.
9


