


Two Stage Microwave Cooking
For best results, many foods need to be cooked in two stages; that is, you begin cooking
at one power level and then complete cooking on a second power level.
To program your Westinghouse Microwave Oven for two stage cooking:
1. Select the desired power level for stage one by pressing POWER until the desired power level appears.
2. Use the number pad to enter the cooking time in minutes and seconds. For example, to enter a time
cooking time of 6 minutes and 45 seconds, press in sequence 6 4 5
.
3. Next, select the power level for stage two by pressing
POWER until the desired power level is displayed.
4. Set the desired cooking time for stage two by entering the desired minutes and seconds using
the number pad.
5. Press
START. At the end of stage one cooking stage two cooking will begin. At the end of stage two
cooking, the oven will beep four times.
The Westinghouse Microwave Oven has two defrost modes: Auto Defrost and Time Defrost.
Use Auto Defrost to thaw food based on weight. Use Time Defrost to thaw for a specified amount of time.
Auto Defrost
The Westinghouse Microwave Oven automatically calculates the correct defrosting time and power level based on
the weight of the frozen food.
The maximum food weight that can be entered is six pounds. If a higher weight is entered, the oven will beep
twice and the display window will return to the time of day.
To Auto Defrost:
1. The frozen food must be removed from packaging and placed in a microwave-safe package or container.
Be sure to remove twist ties that contain metal wire. Place the frozen food on the turntable and close
the oven door securely.
2. Press DEFROST one time. The display will flash 0.0.
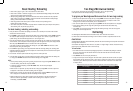
3. Using the number pad, enter the weight of the frozen food in pounds and decimal fractions of a pound.
The microwave will only allow you to enter a single digit for pounds and a single digit for any decimal
fraction of a pound. Round any decimal fractions to the nearest tenth. Please refer to the table below
for sample entries.
NOTE: To convert pounds and ounces to metric units, please refer to the Conversion table on page 31.
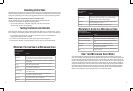
If the food weighs Press Display Reads
.25 pounds 2 0.2
.50 pounds
5 0.5
.75 pounds
7 0.7
1.0 pounds 1 0
1.0
1.25 pounds 1 2 1.2
1.50 pounds 1 5
1.5
1.75 pounds 1 7
1.7
2.0 pounds 2 0
2.0
13
Basic Heating/Reheating
• Please refer to page 9, Figure 3, for an illustration of the Control Panel.
• Please refer to Section 7,
Reference on pages 19-31 for recommended heating/cooking times and power
settings for many typical foods and beverages.
• When preparing packaged food, follow the instructions on the label for container size and preparation
power setting, and cooking time.
EXCEPT: Disregard instructions to rotate containers midway through
cooking as the turntable makes this unnecessary.
• Avoid using containers with metallic parts or metallic finishes such as painted gold trim.
Remove twist ties with metal wires.
• Cover foods loosely with a microwave-safe paper towel or microwave-safe plastic wrap to avoid splatters,
reduce cooking time, and prevent drying the food.
For basic heating, reheating, and cooking:
1. Place your food in a microwave-safe package or container. Set it carefully in the center of the turntable
and close the oven door securely.
2. Press
POWER to select the power setting. P 10 will appear in the display window. Pressing POWER repeatedly
will reduce the power setting one level at a time from P 10 (highest) to P 1 (lowest). If you do not select
a power setting, the oven automatically operates at P 10, the highest level.
3. Enter the desired cooking time by pressing the digits on the number pad. For example, to enter two minutes
and ten seconds, press in sequence: 2 1 0. The digits you select will appear at the top of the display window
while the prompt PRESS START flashes in the lower half of the display window.
If you make a mistake or decide to change the cooking time, press
STOP/CANCEL one time and re-enter
the desired power setting and cooking time.
4. Press
START to begin cooking. The display window will show the remaining cooking time, counting down
continuously. When the full cooking time has elapsed, the oven will beep four times and the time of day will
reappear on the display window.
5. Press the door release to open the door and using oven mitts, remove your food.
6. If the food needs to cook longer, you may follow the steps above, selecting a power level and cooking time.
Or, simply press ADD 1 MIN
. to add one more minute of cooking time at high power.
NOTE:
• You may interrupt cooking at any time by pressing the door release or by pressing STOP/CANCEL one time.
To resume cooking, close the door and press
START.
• To cancel the program completely, press
STOP/CANCEL twice. The time of day will appear
in the display window.
• While the oven is in operation, you may view the time of day by pressing
CLOCK. The time of day will be
displayed for a few seconds, and then the cooking time will reappear.
• While the oven is running, you may view the current power level by pressing
POWER. The power level
will be displayed for a few seconds, and then the cooking time will reappear.
• When the cooking time is longer than 5 minutes, the fan will continue to run and the turntable will
continue to rotate for approximately 15 seconds after the cooking time is complete. To turn off
immediately, press
STOP/CANCEL.
12
Defrosting