


— 5 —
ASSEMBLY
Legs
Position fryer in an open space near the final installation area. Tilt fryer back, being careful to avoid
scratching the finish. Thread front legs clockwise into mounting plates provided on the bottom of
the fryer until seated. Tilt to front and thread back legs similarly. Carefully raise fryer to its normal
position and place it in the installing location.
Fryers Mounted on Optional Casters
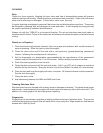
Fryers mounted on casters must use a flexible
connector (NOT SUPPLIED BY WOLF) that complies
with the Standard for Connectors of Movable Gas
Appliances, ANSI-Z21.69 • CSA6.16 and a quick-
disconnect device that complies with the Standard
for Quick-Disconnect Devices for Use With Gas Fuel,
ANSI-Z21 • CSA6.9.
In addition, adequate means must be provided to
limit the movement of the appliance without depending
on the connector and the quick-disconnect device or
its associated piping to limit the appliance movement.
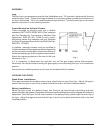
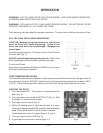
Attach the restraining device to the rear of the fryer
as shown in Fig. 1.
If it is necessary to disconnect the restraint, turn off the gas supply before disconnection.
Reconnect the restraint before turning the gas supply on and returning the fryer to its installation
position.
Instructions for installing casters to the fryer are included with the casters.
LEVELING THE FRYER
Stand Alone Installations
Once gas connections have been made, place a spirit level on top of the fryer. Adjust the legs to
ensure that the fryer is level front-to-back and side-to-side in the final installed position.
Battery Installations
When the fryer is part of a battery lineup, line the fryer up front-to-back and side-to-side with
adjacent battery equipment. Equipment front tops and manifold pipes must be aligned with adjacent
equipment. Once the fryer is in its exact location in the battery lineup, place a spirit level on top of
the fryer. Adjust the legs to ensure that the fryer is level front-to-back and side-to-side in the final
installed position.
Fig. 1