


Pro Wall Hood Installation 13
wolfappliance.com/specs
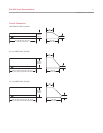
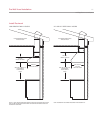
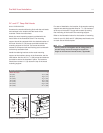
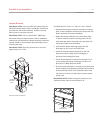
WIDTH OF HOOD
26
1
/4
"(667) TO
MOUNTING BRACKET
HOLE CENTERS
13
1
/8
"
(333)
HOOD CENTERLINE
USE ROUND
AND SLOTTED
HOLESTO
SECURE HOOD
TO WALL
STUDS
MOUNT
BRACKETSTO
WALL FRAMING
7
7
/16
"(189)
TO TOP OF
BRACKET
Low-profile wall hoods—vertical discharge.
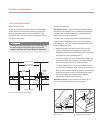
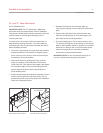
Low-Profile Wall Hoods
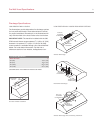
HOOD INSTALLATION
IMPORTANT NOTE:
If a backsplash is to be used, it should
be installed prior to mounting the wall hood. Refer to
installation instructions provided with the backsplash.
Install the wall mounting brackets as shown in the illustra-
tions below. Hang the wall hood on the installation
brackets in preparation for attaching the hood to wall
framing.
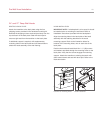
Position the hood in the desired location on the wall.
Depending on the application, install the #10 x 1
1
/2" (38)
screws with washers or 3" (76) drywall screws through the
mounting holes on the back plate. Verify that the screws
engage the wall framing. If not, wall anchors must be
used.
If additional support is required for the wall hood, drill
supplementary mounting holes in the back plate and use
these holes to attach the hood assembly to the wall
framing.
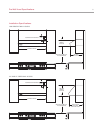
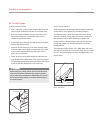
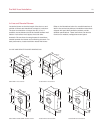
WIDTH OF HOOD
26
1
/4
"(667) TO
MOUNTING BRACKET
HOLE CENTERS
22
1
/2
"(572)
CENTERED ON HOOD
9
1
/2
"(229)
CENTERED
ON HOOD
13
1
/8
"
(333)
HOOD CENTERLINE
USE ROUND
AND SLOTTED
HOLESTO
SECURE HOOD
TO WALL
STUDS
MOUNT
BRACKETS TO
WALL FRAMING
7
7
/16
"(189)
TO TOP OF
BRACKET
WALL HOLE
CUT-OUT
Low-profile wall hoods—horizontal discharge.