


Pro Wall Hood Installation 15
wolfappliance.com/specs
•
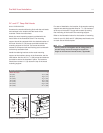
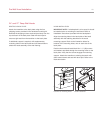
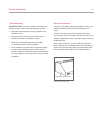
Separate the transition from the back plate by
removing the shipping nut from the inside of the back
plate.
• Position the back plate in the desired location and
mark the mounting holes on the wood support. Drill
pilot holes for the mounting hardware.
• If you are installing an in-line or remote blower, drill a
7
/8" (22) hole through the wood framing for the conduit.
Refer to the illustration below for location of the hoods'
electrical box. Refer to the in-line and remote blower
sections on pages 20–21 and follow installation
instructions provided with the blower.
IMPORTANT NOTE: Do not run electrical wiring for an
in-line or remote blower through the ductwork.
24" and 27" Deep Wall Hoods
HOOD PREPARATION
IMPORTANT NOTE:
For 24" (610) and 27" (686) deep
wall hoods using an internal blower, refer to installation
instructions provided with the blower assembly. Install the
internal blower to the back plate assembly prior to
mounting the hood.
If a duct cover is to be used, follow the instructions on
page 9 before installing the hood. If you are installing a
recirculating kit, refer to instructions included with the kit
before installing the hood.
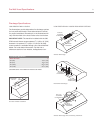
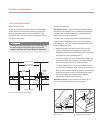
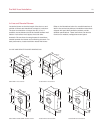
• The hood is shipped with the back plate and transition
assembly attached. The transition is shipped upside
down in the top of the hood. It must be removed and
reinstalled in the proper position.
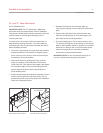
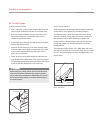
• Remove the filters by pushing each filter up at the
angle it is placed in, and rotate down. Remove the
center filter first. Then take out the grease cups placed
on the bottom edge of the hood coinciding with the
bottom edge of the filters. Gloves should be worn
when handling filters.
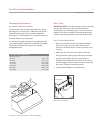
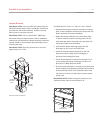
• Detach the back plate and transition assembly from the
hood by removing the top and back screws. Do not
discard the screws, they will be used in the installation.
Refer to the illustration below.
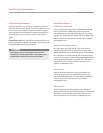
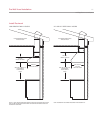
Back plate and transition. Location of electrical box.
ELECTRICAL BOX