Please ensure that when the appliance is
installed it is easily accessible to an engineer
in the event of a breakdown.
All installations must comply with the local
authorities requirements for the discharge of
exhaust air.
Incorrect installation may affect the safety of
this cooker hood.
Installation Requirements
Before installation check that the wall to
which the cooker hood is to be fitted for
electric cables, water pipes and gas.
This cooker hood is designed to be fixed to any
vertical surface over a cooking area, and can be
used in the extraction (ducted to the outside) or
recirculation mode.
The installation work must be undertaken by a
qualified and competent person.
The manufacturer disclaims any responsibility for
damage due to incorrect installation of the cooker
hood or if the hood is not installed in compliance with
relevant regulations controlling this type of installation.
Clearance Heights
The cooker hood is designed to be fitted over a
cooking appliance at the clearance heights stated,
providing the maximum output of the appliance
beneath does not exceed the maximums quoted in the
Technical Specifications.
If the output of the appliance below the cooker hood
exceeds the maximum outputs quoted, please refer to
the cooker manufacturer’s installation instructions.
A minimum clearance height of 650mm (25½ins) is
required when installed above a built-in electric hob,
or 700mm (27½ins) when installed above a built-in
gas hob.
A minimum clearance height of 685mm (27ins) is
required when installing above a slot-in electric
cooker, or 787mm (30½ins) when installed above a
slot-in cooker.
When installed between adjoining wall cabinets, the
wall cabinets must not overhang the hob and the
distance between the underside of the cabinet and
the worktop must be 450mmm (17¾ins), a gap of
50mm (2ins) must be maintained either side of the
hob.
This cooker hood must not be installed
above a cooking appliance with a high
level grill.
The hood can be installed above these heights but for
optimum performance it should be installed at the
distances quoted for the appropriate heat source.
11
Drilling the Ceiling/Support
Shelf
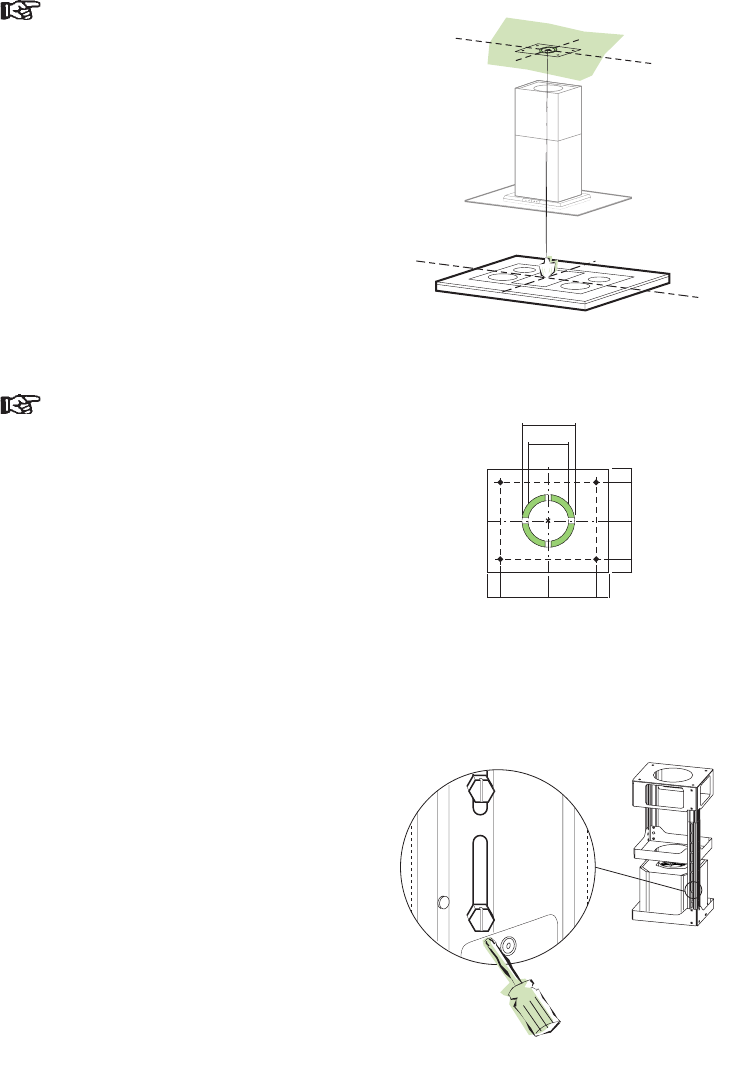
Using a plumb line mark the centre point
of the hob on the ceiling or support
shelf.
Position the drilling template item 21 on
the ceiling or support shelf ensuring the
template is aligned correctly with the
angles of the hob.
Mark the hole centres.
Pilot drill the fixing holes at the points
marked for the approprate size rawl
plugs and screws (not supplied).
It will also be necessary to drill a
Ø10mm hole for the mains cable and the
ducting if the hood is to be installed
ducted to the outside.
Fixing the Frame
IMPORTANT: Before fixing, separate
the Upper Chimney section 2.1 and the
Lower Chimney section 2.2 from the
frame by removing the screws 12c.
Then separate the two sections of the
frame by unscrewing the 8 screws
located on each side of the frame.
Upper Frame
Feed the mains cable through the frame
and the hole in the ceiling or support
shelf.
Fix the Upper Frame 7.1a to the ceiling
(screws not supplied).
Lower Frame
Fix the lower frame using the 8
screws removed earlier and adjust the
length according to the installation
height (the minimum distance before
fitting the hood body 1 must be 710mm).
When the hood is to be installed in the
recirculation mode, position the frame in
the direction you want the recirculated
air to pass into the kitchen.
The frame mountings must be secure
enough to withstand the weight of the
cooker hood and any knocks the hood
may get through normal ware and tear.
12


