The following guide requires voltage to be present when troubleshooting the control. When
the guide refers to connecting pins on the power connection, unplug the power connector
from the board and refer to the attached illustration. These are numbered 1 through 9.
Using a strand of #16 gauge wire, connect the pins as numbered in the troubleshooting
guide. Extreme caution must be taken when connecting these pins to avoid control board
damage or electrical shock.
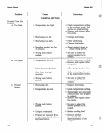
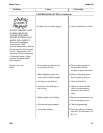
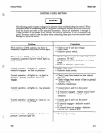
With switch in COOK position, the fryer is
completely inoperative (no power switch light).
With switch in COOK position, the fryer is
completely inoperative (power switch light on,
pump works).
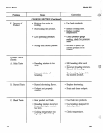
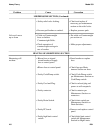
Control operative - all lights on - primary
contactor engages - no heat or pressure.
Control operative -
all lights on - no heat or
pressure - primary contactor does NOT
engage.
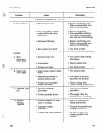
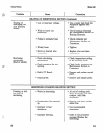
Control operative - all lights on - has pressure
- no heat.
Control operative - all lights on - heat on - no
pressure - pressure light OFF.
Control operative -
all lights on - heat on - no
pressure - pressure light ON.
Check to see if unit has voltage.
Check fuses.
Defective power switch.
+S Check voltage on pins 1 and ‘7 on the power
connector, 10 VAC.
If voltage is present, check fuse on control
board.
@ If fuse is defective, replace fuse.
Check 5 amp fuse located on heat shroud -
fuse OK.
Check voltage from center of fuse to ground
- 208/240 VAC.
Defective transformer.
Connect pins 4 and 6 on the power
connector.
If contactor engages - replace control boarcJ
If contactor does not engage, replace
contactor.
Connect pins 3 and 6 on the power
connector.
If solenoid engages - defective control
board.
If solenoid does not engage - defective
solenoid coil - 2081240 VAC.
Check programming