Operating Manual
1. Follow the procedure for the removal of
rotors and rotorcase.
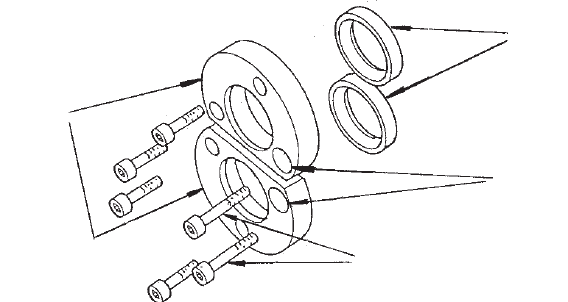
2. Remove the product seal.
3. Three socket head screws retain the seal
carrier, once removed the carrier can be
extracted. As silicon sealant or a gasket
is used to seal the faces the carrier may
have to be eased off carefully with a lever.
4. Once the carriers are removed from the
pump the seals can be pressed out and
replacements pressed in using a suitable
dolly.
5. Ensure the surface area which the seal
will run on is free from scratches, if the
surface is scratched clean up damaged
area with a fine grade abrasive cloth.
Ensure that all traces of abrasive material
are cleaned away before refitting the new
oil seals.
Note : It is advisable at this point to check for
bearing end play, as this may be the cause of
the seals leaking.
Front Seal
Carriers
Front Seals
Large Holes
Longer Socket Head Screws
9.4 Replacing the Front Gearcase Seals
6. Before replacing the seal carriers, clean
the old silicon sealant (if used) from the
rear face of the carrier and from the front
face of the gearcase. Coat the rear face
of the carrier with new liquid gasket, slide
into position and replace the three socket
head screws. It must be noted that one of
the three screws is longer, this should be
inserted in the hole which aligns with the
largest hole in the gearcase. Tighten the
screws evenly to the recommended torque
value.
7. Reassemble the seals and rotorcase, see
the relevant sections for refitting
procedure.
29
