


33
Read all instructions before installing or using this appliance.
Installation Instructions
Save these instructions for future reference.
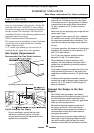
For safety reasons curtains must not be fi tted
immediately behind the range.
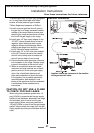
We recommend a gap of 43-5/16” (110cm) (for
Canada 44-5/16” (112.5cm)) between units to
allow for moving the range.
If a fl ush fi t is required (USA only), fi t the range
up to the unit at one side then fi t the unit the
other side.
A clearance of 5” (13cm) is required if the range
is near a corner of the kitchen to allow the oven
doors to open.
Location guidelines
Do not locate the range where it may be subject
to strong drafts. Any openings in the fl oor or wall
behind the range should be sealed. Make sure
the openings around the base of the range that
supply fresh air for combustion and ventilation
are not obstructed by carpeting or woodwork.
Your range is heavy and can settle into soft fl oor
coverings such as cushioned vinyl or carpeting.
Use care when moving the range on this type
of fl ooring. It is recommended that the following
simple and inexpensive instructions be followed
to protect your fl oor.
The range should be installed on a sheet of
plywood (or similar material). When the fl oor
covering ends at the front of the range, the area
that the range will rest on should be built up with
plywood to the same level or higher than the
fl oor covering.
This will allow the range to be moved for
cleaning or servicing. Also, make sure your
fl oor covering will withstand 180°F. (See the
Installation Safety Instructions section.)
Make sure the wall coverings around your
range can withstand the heat generated (up to
200°F) by the range. (See the Installation Safety
Instructions section.)
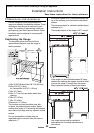
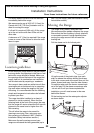
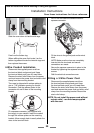
Moving the Range
The range is very heavy. Take great care.
We recommend two people maneuver the range.
Ensure that the fl oor covering is fi rmly attached,
or removed to prevent it being disturbed when
moving the range around. You will need the
leveling tool.
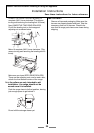
Pull the drawer out to its furthest point.
Lift up the ends of the plastic clips (one each
side) to release the catches holding the drawer
to the side runners and at the same time pull the
drawer forward and away from the side runners.
For safety’s sake push the drawer runners back
out of the way. Put the drawer somewhere safe
- do not refi t it until you have completed the
installation, you will need access to the area
behind the drawer.
Fit the leveling tool on the rectangular adjuster
as shown below.