


16 17
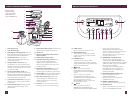
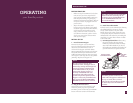
USING THE YOUBREW
®
- SINGLE CUP MODEUSING THE YOUBREW
®
- CARAFE MODE
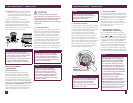
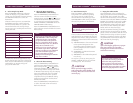
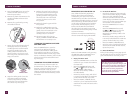
5. Start the Brew Cycle
Press the START | CANCEL button. The
grinder will commence grinding the
correct amount of coffee for the selected
brew size and strength. If the
‘PRE-GROUND’ coffee setting has been
selected, the grinder will be disabled.
NOTE
Steam may emit from the rear steam
vent during grinding and brewing.
This is normal.
The count-down timer will then begin. The
time displayed is an estimate only and will
depend on the amount and strength settings
you have selected.
The LCD screen will display:
a) ‘PRE-HEATING’ as the water is heated
to the optimal temperature. The
pre-heating time will depend on the
starting temperature of the water in
the water tank.
b) ‘BREWING’ as the coffee is dispensed
into the carafe.
To stop the cycle at any time, press the
START | CANCEL button. You will hear
a winding noise. This is normal.
CAUTION
Never open the swing-out door and
remove the coffee basket while brewing.
Hot water and coffee can cause injury.
6. Using the Brew Pause Feature
The Brew Pause feature temporarily
ceases the fl ow of coffee when the carafe is
removed so a cup can be poured mid-brew.
Do not remove the carafe for longer than
20 seconds or the coffee may overfl ow the
coffee basket.
7. Empty the Coffee Basket
Once the brewing cycle is complete, the
ready signal will sound and a winding noise
will be heard. This is normal. The coffee
machine will automatically shut-off, however
the LCD screen will fl ash ‘EMPTY COFFEE
FILTER’ as a reminder to remove the coffee
basket and discard the used grinds. Wash
the coffee basket, taking particular care to
rinse the chute area. Then dry the coffee
basket and chute area thoroughly.
We also recommend checking the coffee
grinds chute disc for any build-up of coffee
grinds. This is the stainless steel disc that is
visible when the swing-out door is opened.
A build-up of grinds on this disc can affect
the performance of the machine. Wipe the
disc clean then dry thoroughly.
CAUTION
The coffee basket and gold tone or
paper fi lter may still be very hot after
brewing. Use caution and allow to cool
before removing.
8. Pour and Enjoy
Ensure the carafe lid is securely locked in
position. There is no need to turn or adjust
the lid before pouring. The lid automatically
opens when pouring and closes when not to
keep coffee hot.
CAUTION
Hot steam may rise when pouring.
The bottom of the carafe is hot to touch
for several minutes after brewing. Use
caution and ensure not to set the carafe
on a heat sensitive surface.
USING THE YOUBREW
®
- SINGLE CUP MODE
First Time Use Only
We recommend fl ushing the machine to
remove any dust particles or residues from
the manufacturing process. Follow the
instructions, ‘Using the YouBrew
®
- Carafe
Mode’, ensuring to completely fi ll the water
tank (Step 1), select ‘12 CUPS’ (Step 3)
and the ‘PRE-GROUND’ coffee setting
(Step 4). However do not add any coffee
to the coffee basket. Once the cycle is
complete, discard the water from the carafe
and repeat the cycle again for best results.
The machine is now ready to use.
CAUTION
We recommend using cold, fi ltered
water. We do not recommend the use of
de-mineralized or distilled water as this
may affect the taste of brewed coffee
and how the coffee machine is designed
to function.
1. Fill the Water Tank
Press open the fl ip-top lid. Pour the desired
amount of cold, preferably fi ltered water into
the tank using a jug or the provided carafe.
If using the carafe, ensure the carafe lid is
securely locked in place. The LCD screen
will indicate the amount of water in the tank
as it is fi lled. The machine will beep when
full and the water level fl oat will rise to
indicate the maximum level. Do not exceed
the 12 cup maximum. Doing so may cause
water spillage at the back of the machine.
Close the fl ip-top lid.
NOTE
Check the water level on the LCD
screen before use. We recommend
always keeping the water tank full.
The water tank should be refi lled with
cold, preferably fi ltered water. Do not
fi ll with any other liquid.
NOTE
Never pour water into the bean
hopper or grinding chamber area.
Doing so can cause the grinder to
clog. Only re-commence use when
the grinding chamber and grinding
burrs are completely dry. Refer to
Troubleshooting, ‘Moisture clogging
grinder’, page 29.
NOTE
Never fi ll the water tank once the
coffee machine has started a brewing
cycle. This will affect the volume
dispensed into the cup.
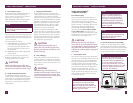
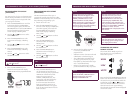
2. Pre-Warm the Cup or Travel Mug
A warm cup will help maintain the coffee’s
optimal temperature and keep coffee hotter
for longer. Fill the cup with hot water for about
30 seconds then discard the water. Place the
cup into position under the drip stop outlet.
TIP
For taller cups and travel mugs,
remove the drip tray at the base of
the machine. Press the OPEN button
to open the swing-out door. Insert
the cup/mug into the drip tray cavity
before closing the swing-out door. The
maximum cup/mug dimensions are
7.5" height, 2¾" diameter.
REMOVE DRIP TRAY, OPEN DOOR,
INSERT CUP, CLOSE DOOR.