


8
INITIAL FILL
CAUTION: The dispenser must be disconnected from the power source throughout the initial fill except when
specified in the instructions.
1. Remove drip tray assembly and splash panel from the dispenser.
2. Pull the overflow tube from its retaining clip and place the end into an empty 64 fluid ounce (2 liter) container.
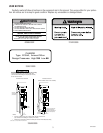
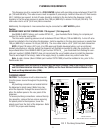
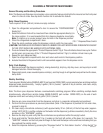
3. Ensure that the Main Water Valve and the Water Bath Valve Fig 4, are turned off (handles positioned at 6 o’clock
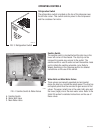
and 12 o’clock, respectively,) and that the Refrigeration Switch Fig 3, is in the OFF (rear) position.
4. Turn on the water supply.
5. While observing the water bath sight gauge (the clear tube located just to the left of the plumbing connections,)
begin filling the water bath by rotating the handle of the Water Bath Valve counterclockwise to the 9 o’clock
position.
6. When the water level in the sight gauge comes within 1 inch (25.4 mm) of the clear plastic tee, reduce the water
flow by rotating the handle of the Water Bath Valve clockwise to the 11 o’clock position.
7. When the water in the water bath sight gauge begins to trickle down into the drip tray, turn the Water Bath Valve
off by rotating the handle clockwise to the 12 o’clock position.
8. Connect the dispenser to the power source.
9. After approximately 3 minutes (this allows the recirculating pump and cabinet cooling components an
opportunity to fill with water,) top off the water bath tank by rotating the handle of the Water Bath Valve
counterclockwise to the 11 o’clock position.
10. Again, when the water in the water bath sight gauge begins to trickle down into the drip tray, turn the Water
Bath Valve off by rotating the handle clockwise to the 12 o’clock position.
11. Place the Refrigeration Switch ON (forward.)
12. It will take approximately 4 hours at 70 degrees F (21 degrees C) ambient to create the ice bank required for
full dispenser performance. During this time, some further trickling from the water bath is expected due to
expansion caused by ice bank formation. While the refrigeration system is creating the ice bank, the dispenser
may be readied for use as described in
Loading, Priming
and
Adjustment.
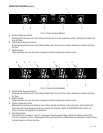
13. The dispenser will safely store concentrate once the “COOLING” indicator completely extinguishes (not lit
steadily or flashing.)
14. After the refrigeration compressor switches off, turn Main Water Valve on by rotating the handle counterclock-
wise to the 3 o’clock position. Secure the overflow tube into its retaining clip and replace the splash panel and
drip tray assembly.
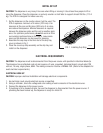
LOADING
Frozen Concentrates
1. Thaw the frozen concentrate in a refrigerated 35-40 degrees F (1.6-4.4 degrees C) environment for 36 to 48
hours before use.
2. Thoroughly mix the thawed concentrate by vigorously shaking the product container.
3. Open the dispenser door.
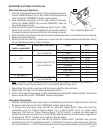
4. Prior to placing the product container in the dispenser, make sure that the o-ring on the container adapter is
lubricated. This will ease removal of the container when it becomes necessary.
5. Place the product container in the desired position and press it firmly into the bottle adapter opening.
6. Open the vent hole in the product container.
Note: Concentrate in the container must be completely thawed and be within the temperature range of 35-40
degrees F (1.6-4.4 degrees C.) Product outside of this temperature range, especially below, will produce an
“out of brix” drink.
33496 011101