


5
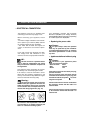
Fig. 04
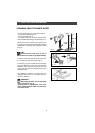
Fig. 03
You can use the top of the appliance as a
worktop.
NB:
Do not position your dishwasher too close to
a heat source; otherwise the trim around the
top could be damaged.
•
BUILT-IN APPLIANCES
•
FREE-STANDING APPLIANCES
•
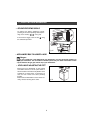
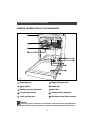
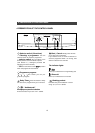
Installation dimensions
By removing the appliance’s worktop you can
build in your appliance under an existing
worktop provided that the space conforms to
the dimensions on the sketch. (Fig. 01)
•
Building in your appliance under
a worktop
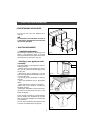
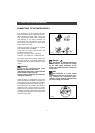
If you are building in your appliance under an
existing worktop:
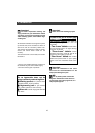
— Remove the top of the appliance by unscre-
wing the two screws under the edge of the
top (Fig. 02).
— Remove the top by unclipping it from the
back of the appliance and pushing it a few cm
to move it (Fig. 03).
— Lift the top of your dishwasher to release it
(Fig. 03).
— Insert the dishwasher into its appropriate
space
— Adjust the height of the feet, if necessary
(please refer to the Section: “Levelling by
adjusting the feet”).
— Fasten your dishwasher to the kitchen work-
top with two screws under the front of the
plastic lip (Fig 04).
If your worktop is marble or a similar material,
you can fasten your dishwasher at the side
with two brackets (available from After-Sales
or your dealer).
You can also incorporate your appliance into
a vertical unit (raised above the ground).
Fig. 02
Screw
820 - 830
820 min
110 mn
50
595
600
570 min
570
Fig. 01
2 / INSTALLING YOUR DISHWASHER