


3
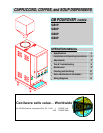
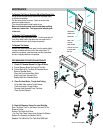
START UP INSTRUCTIONS FOR GB POUROVER CAPPUCCINO DISPENSER
(see illustration 9-3 for clarification)
I. INSTALLATION INSTRUCTIONS
This equipment is to be installed to comply with the applicable Federal, State, or local plumbing codes having jurisdiction.
In addition:
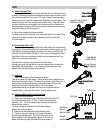
1. A quick disconnect water connection or enough extra coiled tub
ing (at least 2x the depth of the unit) so that the machine
can be moved for cleaning underneath.
2. An approved back flow prevention device, such as a double check valve to be installed between the machine and the
water supply.
The GB beverage dispenser is equipped with a ¼" Flare Water Inlet Fitting whi
ch is located on the left side in the back of the
base (when looking at the machine from the front).
HIGHLY RECOMMENDED:
A WATER SHUT-OFF VALVE and A WATER FILTER, preferably a combination
Charcoal/Phosphate Filter, to remove odors and inhibit lime and scale build up in the machine.
Note: In areas with extremely hard water, a water softener must be installed in order to prevent a malfunctioning of the
e
quipment and in order not to void the warranty.
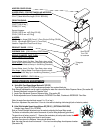
After the machine has been unpacked and placed on a counter, pull out the stainless steel drip tray.
It should contain the following: A Set of 4
Adjustable Leveling Legs & Water Inlet Fitting.
Connect the ¼"
dia. copper waterline to the ¼" flare water inlet fitting of the valve.
Caution: Do not plug into power outlet yet. Make
sure the Heater Switch is OFF (Toggle Down)
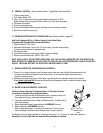
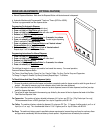
II. PRIMING - MANUAL/BOTTLE POUROVER -
Water Selection Switch -Toggle Up (See Back Panel)
1. Do NOT plug into power outlet yet.
2. Make sure Heater Switch is in the OFF position.
3. Fill reservoir tank (top) with 2 gallons of water, wait about 3 mi
nutes for water to fill Heating Tank below.
Refill Top Reservoir Tank with another 2 gallons of water.
The unit will NOT dispense unless the Top Reservoir Tank is at least 1/2 full.
So keep Reservoir Tank full
.
Note: The unit has a Float-low water cutout switch
(item 2, Ill. h-1) inside the Reservoir Tank,
which stops the machine from dispensing when the Reservoir Tank is empty.
4. Plug into power outlet.
5. Turn Heater Switch ON.
6. Allow 10 to 15 minutes for water to reach dispense temperature of 185°F. Heater Indicator Light (red) goes ON when
he
ater is on (see lower front panel).
7. Fill hopper with product.
8. Place cup under dispenser.
9. Push and hold Dispense Button (green) until water flows from mixing chamber.
10. Machine is primed and ready to go.