


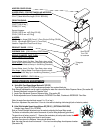
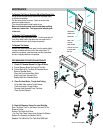


III. PRIMING - AUTOFILL
- Water Selection Switch - Toggle Down (See Back Panel)
1. Plug into power outlet.
2. Turn Heater Switch ON.
3. Allow 10 to 15 minutes for water to reach dispense temperature of 185°F.
Heater Indicator Light (red) goes ON when
heater is on (see lower front panel).
4. Fill hopper with product.
5. Place cup under dispenser.
6. Push and hold Dispense Button (green) until water flow s from mixing chamber
7. Machine is primed and ready to go.
IV. POUROVER-PORTABLE BOTTLE OPERATION (Wa
ter Selection Switch - toggle UP)
Unit Can Be Operated With a 3 Gallons Capacity Fresh Water Bottle.
To Operate With Portable Bottle, proceed as follows:
1. Remove Reservoir Tank Cover.
2. Make sure that Reservoir Tank is only 1/2 full or empty, to prevent water splillage.
To remove excess water push dispense button.
3. Fill bottle with water .
4. Invert bottle into reser
voir tank in one motion to minimize spillage.
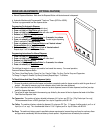
5. Remove and refill bottle when “REFILL“ light is ON.
NOTE: REFILL LIGHT, ON THE FRONT DOOR PANEL, WILL GO ON,
WHICH INDICATES THAT THE WATER TANK
MUST BE REFILLED. WHEN REFILL LIGHT GOES ON, THE UNIT WILL NOT DISPENSE UNTIL TANK IS FILLED WITH
WATER. REFILLING WITH HOT TAP WATER WILL SHORTEN HEAT UP TIME.
V. NORM
AL OPERATION (POUROVER AND AUTOREFILL)
1. Place a 6 o
z. or larger cup under the left dispense nozzle, then press and hold the left dispense switch for 6
seconds. The machine will dispense water at the rate of 1 oz. per second. Repeat it several times to
check for consistent output.
2. While the tank is heating up, remove the hopper, load with product and reposition it back in the machine.
When
R
eady Light goes ON, the tank has reached its brew temperature and the machine is ready to begin
dispensing the first cup of Cappuccino.
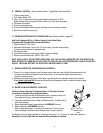
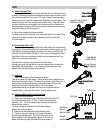
WATER FLOW ADJUSTMENT
DISPENSE VALVE
L467A
VI. WATER FLOW ADJUSTMENTS, FLOW RATE
The Unit Is Factory Adjusted To Dispense Water At Th
e Rate of 4 oz/sec.
To increase or decrease flo
w, proceed as follows:
1. Remove Left side p
anel and locate Dispense Valve mounted on tank, with
Flow Adjuster facing up, underneath cold water reservoir.
2. Locate Flow Adjustment Screw (white) on Dispense Valve. Use Allan Key to
reac
h Flow Adjuster.
3. Rotate Adjustment Screw Counterclockwise to INCRE
ASE flow rate.
4.
Rotate Clockwise to DECREASE flow rate.
When making adjustments, do not adjust by more than 1/4 turn at a time,
with
out checking output flow or drink strength (ratio of water to powder).
The Dispense Valve is factory adjusted for a maximum flow rate of 1 to 1.3 oz./sec. for coffee and cappuccino.
Exceeding 1.3 oz./sec Flow Rate will cause the Mixing Chamber to overflow.
4