


33
VII - Cleaning and care (all models)
Roasting coffee can be a bit messy. The chaff that comes off the beans, bits and pieces of coffee beans,
and stray beans themselves can get strewn about, in and out of the roaster. To create the best coffee
possible, to ensure safe operation, and to extend the life of your Hottop Coffee Roaster, it is very important
to do some regular maintenance and cleaning.
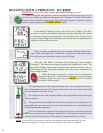
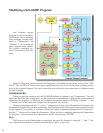
NOTE: Red numbers in parentheses, (5) as an example, refer to the diagram on page 7
WARNING: All cleaning chores should only be done with the machine unplugged and when the
machine has cooled to room temperature. Allow all parts to thoroughly dry before assembling and before
using the machine again!
A. After each roast
(Refer to diagram on page 7)
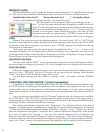
Pull the chaff tray (4) out using the black plastic handle (located under the viewing window on the
front of the machine). Use a soft brush, or kitchen towel to clean the tray. If required, wash the chaff
tray with water and soap. Dry thoroughly before replacing.
IMPORTANT: Some models are equipped with a safety mechanism that makes
it impossible to restart the machine until the chaff tray is removed, emptied, and
replaced.
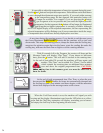
2. Some beans create more chaff than others. At times there can be a chaff build up inside the roasting
chamber after just one roast. To clean out this stray chaff, remove the chaff tray (4), cooling tray (3),
and bean loading cover (2). Then carefully tip the Coffee Roaster forward and gently shake it to remove
stray chaff. Carefully using compressed air can assist in removing the stray bits of leftover chaff and
bean particles. Use caution so as not to displace the material contained in the Top Filter (13) when using
compressed air. WARNING: proper eye protection and breathing protection should be used when
using compressed air to clean out the roasting chamber.
3. To clean the glass viewing window, wait until the machine has completely cooled off and remove the
chaff tray. While holding the front cover (6) on the machine with one hand, unscrew the Gold Knob
(5), until the front cover to be easily lifted off. Use a soft cloth moistened with water to clean the glass.
Encrusted oils on the glass can be removed using a stiff brush or wet nylon scouring pad with a small
amount of dish washing soap. Scrub gently to avoid scratching the glass. Rinse thoroughly and allow
to dry before replacing. Tough buildup can be removed with espresso machine cleaner or diluted TSP
(tri-sodium phosphate).
4. Check the inside of the drum (9) after each roast. Beans can sometimes get stuck in the drum and if
allowed to go thorough a subsequent roast they will bum. The burnt beans can affect the taste of the
entire roast. Remove the front cover of the machine as described in step 3 above and look inside the
drum. Stuck beans can be dislodged using a long-handled, stiff brush, a length of 1/4” wood dowel,
chopstick, or similar tool. If necessary, remove the drum for cleaning (outlined below).
5. Replace the fi lter (
1) at the rear of the machine after using 30-40 times.
WARNING: TO PREVENT FIRE, IT IS
IMPORTANT THAT THE CHAFF TRAY (4)
UNDERNEATH THE ROASTING DRUM IS
FULLY EMPTIED AFTER EVERY ROAST!